Quilts for a cause
You’ll need
- Iron
- Ironing board
- Tailor scissors
- Needles
- Threads
- Secondhand fabric
- Rotary cutter (optional)
- Self-healing cutting mat (optional)
- Transparent cutting ruler (optional)

Before you begin
- Use the safety checklist to help you plan and risk assess your activity. Additional help to carry out your risk assessment, including examples can be found here. Don’t forget to make sure all young people and adults involved in the activity know how to take part safely.
- Make sure you’ll have enough adult helpers. You may need some parents and carers to help if you’re short on helpers.
Running this activity
- This session gives everyone the chance to give sewing a go on a smaller scale before they plan a bigger project that helps others.
- If you want to make quilts for a cause, you’ll probably need to set aside a handful of meetings. We’ve included some guidance below to give you a helping hand.
- If you can, borrow an example quilt to show everyone. If not, a photo will do the job.
- It’s useful to have a quilting expert on board to help out, especially if you’re not a seasoned sewer. Try reaching out for volunteers and explain your plan to make mug rugs or plan a bigger project and see if they’d like to stay involved. Make sure to give them all the information they’ll need and check in with their access needs too. You could invite them to join through a video call if joining you face-to-face isn’t possible or practical.
Introduce the idea
- The person leading the activity should show everyone the example quilt (or photo). They should explain that patchwork quilts use small pieces of fabric sewn together to make the design. This was originally a way to make full use of leftover scraps.
- Explain that making mug rugs will give everyone an idea of the skills they need to make a difference with a quilt (or more) for a cause.
Make mug rugs
This small project's a quick way to learn about piecing and sewing material together. If you’re not a confident sewer, ask an experienced quilter for help or check out video tutorials on YouTube.
- Gather some material. Secondhand fabric is great, as it helps to reduce waste. You can use pretty much anything from old clothes to towels, blankets and bedding. Just make sure it’s been properly washed before you get stuck in.
- If you can get hold of them, an adult volunteer should demonstrate how to use a rotary cutter, ruler and cutting mat to cut fabric into strips or patches.
- Cut the fabric into equal strips about 5 centimetres wide by 20 centimetres long.
- An adult volunteer may want to do them all using the rotary cutter, rule and cutting mat. Alternatively, everyone could carefully cut the fabric with scissors that are suitable for fabric. However, save some bigger pieces to use as the base fabric for the quilt used later on in this activity.
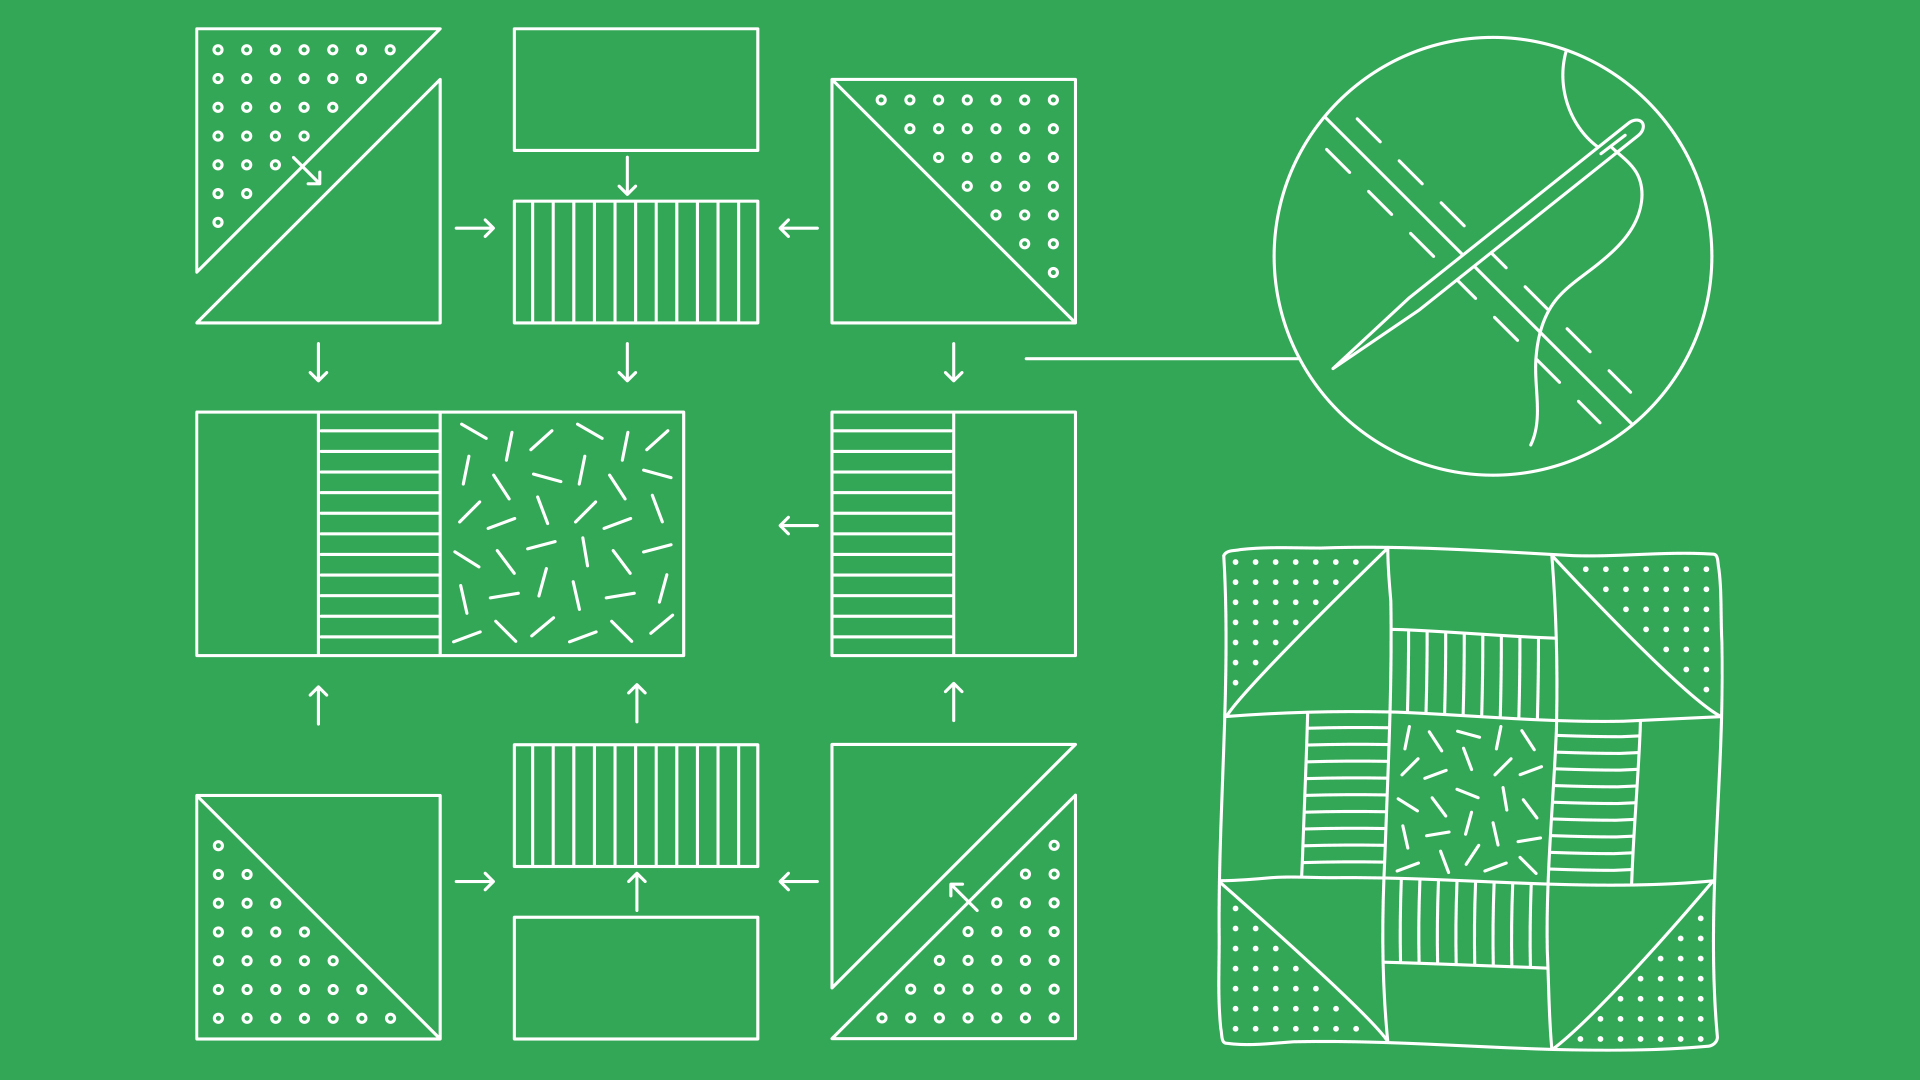
- Everyone should lay out between 8 and 10 strips, putting different colours, patterns, or materials next to each other.
- People need to fold the edges of neighbouring strips underneath, so from above the strips are touching, but the fabric meets underneath.
- People should stitch the strips together. Sew the fabric underneath, so the seam isn’t visible from the top. A ladder stitch is a great choice for a neat, discrete option.
- Once all the strips are sewn together, an adult volunteer should press them with a hot iron. Set the ironing board up away from the group. Older Scouts could use the iron one at a time, with supervision and plenty of space around them. Turn irons off when they’re not being used. An adult should watch over this part of the activity.
- Everyone should use the sewn together stripes as a template to cut out the base fabric. This should be one single piece of fabric.
- People should put the base fabric on top of the stitched striped fabric. The ‘display’ sides, the ones you want to be on the outside of the finished mug rug, should be touching.
- They need to sew around three sides. Sew most of the fourth side, but leave a gap a few fingers wide.
- Everyone should turn their mug rug the right way out and press it with an iron again.
- Now everyone should Top stitch around all four edges, making sure they sew the opening closed.
- Decide what you’ll do with the mug rugs. People may want to take them home, or you could gift them to a local group or organisation.
Plan to make quilts for a cause
- Everyone should split into small groups and sit in a distanced circle.
- Each group should look through the ‘Decide a cause', 'Theme a quilt’ and the ‘Quilting companion’ guidance below. They should chat through all of the details – how could they approach each stage of the project? They’ll need to think about choosing a cause, pattern, and theme; gathering help, equipment, and materials; and planning time and storage.
- Everyone should gather (staying distanced) and share their ideas. What are the potential challenges and obstacles? What are the opportunities? Does anyone in the group have any sewing experience?
- Everyone should get back into their small groups and create a rough project book. This is the time to plan out a timeline, and make lists of equipment and materials. People could make one part of the book each or one person could be in charge or writing down everyone’s ideas.
Groups may want to do some things at home – they could split up tasks, for example, someone could go home and research ‘basting’.
Choose your pattern
Looking at a few different shapes and patterns and decide what’s feasible for you (and your time scale). A simple quilt pattern made up of squares or triangles (or both) can help make sure you end up with a great quilt that you can donate. You can find plenty of tutorials for basic patchwork quilts on online blogs, magazines and YouTube channels. As a starting point, check out Polkadot Chair’s post about making a simple patchwork quilt.
Choose your cause
Think about charitable organisations that may be in need of a little extra warmth and comfort and could benefit from your quilts. For example, you could think about a local care home or homeless shelter, or even a national organisation who’ll make sure it gets to those who need it most. It’s good to have a list of a few options, as an adult will have to reach out to your first choice organisation to make sure they’re happy to receiving your quilt and will find it useful. If your first choice says ‘no, thanks!’, don’t worry. Just try again with someone else. Why not start by exploring the causes Scouts are supporting nationally as part of A Million Hands?
Does your group need help?
Consider inviting someone who quilts to come and lend a hand. You could even invite them to join you through a video call. It could be a parent, carer, or friend, or even someone in your community with experience. An adult could reach out to a local U3A member and ask if anyone would like to work with you on this project.
How will you sew?
Have a look at the ‘Quilting companion’ guidance and decide how you’ll cut the patches and whether you want to get stuck in to hand quality or whether machine quilting is for you. There’s no right answer – it depends on what you’re looking to create and how you want to do it.
What equipment will you need?
By now, you’ll know whether you’re talking ‘sewing machines’ or ‘needles and threads’. Think about other equipment too: what about a rotary cutter and mat? Could you ask to borrow anything you need?
What materials will you need?
Your exact list will depend on the size, theme, and pattern of your quilt. Generally, you’ll be talking fabric you can cut into patches, fabric for the backing, and fabric to use as batting or wadding (basically, stuffing) – as well as plenty of cotton thread. Try to make the most of secondhand materials and limit what you buy new.
How much time will you need?
Quilting is a long learning process for beginners. It can be hard work and tiring. If you’ve got a visitor to help (or can only borrow equipment for a little while) you may need to do two intensive sessions. Otherwise, it’s often best to split it across different meetings. Can you break it down into five or six separate ‘tasks’, and plan them in with some more active games that need less focus? For example, you could split ‘making a quilt’ into: designing, cutting patches, sewing patchwork, basting, adding the top layer of quilting stitches and binding the quilt. Not sure what we’re on about with all those words? No worries: check out this online glossary.
Where will you store your quilts until they are ready to go?
Make sure you can store everything somewhere safe. It shouldn’t get in the way of anyone else using your meeting place, or be left anywhere it could get moved, lost, or damaged). Make sure your storage place is clean and dry.
Themes
A great piece of art explores an even greater story. Why not tie together your quilt with more than needles and thread by choosing a theme? Here are our ideas to get you stated – but feel free to run with your own imagination:
Scouts Local Knowledge Activity Badge
Try creating a patchwork quilt where the materials or patterns tell a story about your local area, national or local heritage, the geography of your area, or a specific local trail or footpath and the landmarks along the way.
Scouts Global Issues Activity Badge
How about using your planning to tackle the issues of fast fashion and the carbon footprint of the textiles industry?
- You could make a difference by using secondhand fabrics.
- You could also spend some time reflecting on the conditions you’re making your quilt in. You’re with friends, and it’s probably pretty comfortable and relaxed. What about the conditions of many people in the real textile industry? What are their rights as workers? Are they comfortable and relaxed? Do they have much spare time?
- You could also chat about how quilts could be used to help people who are facing hardship due to a natural disaster, for example, people in temporary shelter to escape flooding. They could keep people warm – what other benefits could they bring?
Your Scout story
Does your group have materials you could reuse? For example, you could think about old kit bags, blankets, out of date badges, scarves, or shirts. Why not take the opportunity to explore the history of your group? You could even reach out to old members and search for old materials to learn more as part of a wider project.
Memory blanket
Everyone could use their patch (or patches) to tell a little story about themselves. They could focus on an aspect of a hobby, or just a favourite colour or texture. The final masterpiece will be as varied and wonderful as the group.
How will you cut patches?
Source your material and cut your shapes
Accurately measuring and cutting your patchwork is the first step in creating a quilt. It’s up to you how you do this – you could use suitable scissors, a clear ruler, and a mechanical pencil (and people could do this at home), but you’ll probably get a more polished final piece if you use specialist equipment. You could learn to use it together as a group.
Will you choose rotary cutters and mats?
Most people who make quilts regularly use rotary cutters and a self-healing cutting mat. When they’re confident, people can cut multiple layers of fabric at a time.
Nowadays, it’s really easy to get your hands on equipment – check out shops like Hobbycraft, and even Amazon. However, we’d recommend that you don’t buy stuff just for this project. It can be expensive, especially if you’re not planning to use it again and again.
You could ask if anyone you know is willing to share their tools with the group, to see if everyone can go and use facilities at a local college or U3A base.
Find out how to cut your fabric on We All Sew.
Will you choose scissors?
They’re not as accurate, but scissors are a more accessible way to give quilting a go. Far more people have fabric scissors lying around than a rotary cutter and self-healing mat! You’ll find fewer tutorials for cutting patchwork with scissors because most experienced quilters opt to use specialist equipment for precise results.
Fabric scissors may be right for you if they’re easier to get hold of – especially if you can get hold of more than one pair so a few people can cut fabric at once. It’ll probably be a lot quicker (and safer) than sharing one rotary cutter, especially as you’ll have to clean it between uses.
We’ve done the searching for you – here’s a tutorial for cutting quilt patches with scissors.
Will you hand quilt or use a machine?
For hand quilting, you’ll need:
- Needles (special needles called ‘betweens’ are best – most people choose size 10 or 12)
- Thread (hand quilting thread is specially coated and thicker than regular thread)
- Hoop (to hold your fabric firmly in place)
- Thimble (you might need a couple of size options to fit everyone’s hands)
Pros of hand quilting
- It’s a cheaper option.
- You may find it more relaxing.
- It’s portable – you can take it almost anywhere.
- You may have more artistic power – some people say hand quilting has a nicer, more personal finish.
- It’s gentler – especially if you’re trying to preserve older or delicate secondhand fabric.
- You can give fancy handiwork a go.
- It’s easier for lots of people to learn the basics at the same time.
Cons of hand quilting
- It’s really time consuming.
- Your hands will probably ache.
- It’s really tricky for anyone who struggles with fine motor skills (but a machine won’t necessarily be much better).
- There’s a chance people could get a repetitive strain injury (but this is also a risk with sewing machines).
- There’s a limit to how big your quilt can be – hand quilting’s only really suitable up to about 50 inches by 50 inches (otherwise you’re likely to be stretching your project across too many meetings).
- Stitches won’t be as durable, especially if people are beginners.
For machine quilting:
You’ll need to borrow a suitable machine. All you really need is a basic, standard sewing machine that can do straight line and free motion quilting. These machines are more portable and they’ll be easier to set up in your workplace.
Alternatively, you could see if you can borrow an industrial sewing machine. You’ll be able to go faster with an industrial machine, and they often have a knee lifter (a bar which sits next to your knee and allows you to lift the presser foot without taking your hands off the quilt).
Pros of machine quilting
- It’s much faster than hand quilting.
- It may be more accessible for anyone who finds it difficult to handle a needle and thread.
- It’s likely that machine stitching will be more durable.
Cons of machine quilting
- It’s more expensive than hand quilting – even if you don’t a machine, you’ll be responsible for an expensive piece of equipment.
- It can be tricky to learn because machines are different.
- It can be harder to correct a mistake (for example, it may involve resetting the machine).
- People will have to learn and work individually, probably one at a time. You can’t all join in at once unless you have loads of machines.
- There’s always the possibility of a technical failure – what would you do if something went wrong?
Make the quilt sandwich
You’ll probably see lots of jargon floating about – so here’s a handy guide to three common stages of making a quilt.
Baste your quilt
Basting is how you connect the three elements of the quilt (the patchwork top, the quilt backing, and the batting or stuffing). Once your patchwork quilt top’s ready (and the backing and batting are cut to size), then you’re ready to baste your quilt. Basting your quilt isn’t about holding it together forever – it’s about keeping it all in the right position for now so you can sew it together.
There are lots of different ways to baste a quilt. Special basting spray is quicker, but safety pins are more sustainable because you can use them again and again.
For more information on securing your quilt sandwich, and some handy hints and tips, head to Suzy Quilts.
Quilt your stitches
After basting, you’ll be ready to quilt your stitches and permanently secure the layers of your sandwich (yay!). This is where having an experienced sewer or quilter comes in, it’s best if one can oversee this stage and pass on their skills.
It’s up to you what type of quilting pattern you use – it comes down to preference. However, for a shared project like this it may be best to stick to something simple (and good for beginners). You could choose straight line quilting – a straightforward stitch that’s good for both hand and machine quilters. Read more about straight line quilting at We All Sew.
Bind your quilt
Once you’ve basted and quilted, you’ll be ready to bind. Binding is when you close off the exposed raw edges of your fabric by securing long strips of fabric around the edge. This final step permanently secures your quilt top, batting (stuffing), and backing together.
By now, it’s probably not a surprise that there are lots of different ways to bind a quilt. Double fold binding’s a popular choice for beginners. You can learn the basics of double fold binding at We All Sew.
Reflection
This activity was all about developing skills. When else might people use these skills? People could think about making gifts for others or mending things like clothes. What was the trickiest bit of learning this skill?
This activity also needed people to care. Who did ask about donating quilts? Did everyone want to accept them? Why were some organisations a better fit than others? What difference will the quilts make? What else does that organisation need to be able to help people?
Safety
All activities must be safely managed. You must complete a thorough risk assessment and take appropriate steps to reduce risk. Use the safety checklist to help you plan and risk assess your activity. Always get approval for the activity, and have suitable supervision and an InTouch process.
You must run your activities in line with the Safeguarding Code of Conduct for Adults (Yellow Card) and report any concerns to the UK HQ Safeguarding Team.
- Scissors
Supervise young people appropriately when they’re using scissors. Store all sharp objects securely, out of the reach of young people.
- Sharp objects
Teach young people how to use sharp objects safely. Supervise them appropriately throughout. Store all sharp objects securely, out of the reach of young people.
It’s up to you (and everyone’s skills) how complicated your quilt is. If anyone’s more experienced, they may want to challenge themselves with trickier detailing.
Such a big project should have roles for everyone. For example, anyone who finds fine motor skills tricky could play a bigger role in sourcing materials or designing, and leave the fiddly needlework to others.
Equipment, such as needle threaders and sewing machines, can make the practical part of this activity more accessible. Ask around and see what you can borrow.
All Scout activities should be inclusive and accessible.

If people wanted to make a bigger difference, they could make another quilt for the cause in their own time. Why not ask the community or group you’re donating your quilts to how else you could help?
Young people are choosing the theme of their quilt and where to donate it – it’s up to them to shape the project and establish where their hard work and skills are put to use.