
Seafaring scenes
You’ll need
- Scissors
- Pens or pencils
- Coloured pens or pencils
- String
- Clean items of recycling
- Camera or phone
- Life jacket
- Tarpaulin (blue is best)
- Mocked up adventure photos (digital or copies)
- Rope (optional)
- Buoyancy aid
- Camera accessories (optional)
- Aquatic adventure kit (activity specific)
Before you begin
- Use the safety checklist to help you plan and risk assess your activity. Additional help to carry out your risk assessment, including examples can be found here. Don’t forget to make sure all young people and adults involved in the activity know how to take part safely.
- Make sure you’ll have enough adult helpers. You may need some parents and carers to help if you’re short on helpers.
Setting up this activity
- Before you get stuck into this activity, you could book a visit from the RNLI to learn about water safety.
- Try to schedule this activity at a time when people in the group are taking part in watersports or other activities on the water. For instance, they might be working towards their Nautical Skills Staged Activity Badge of their Time on the Water Staged Activity Badge.
- Bring along a camera that you or another volunteer is familiar with and knows how to adjust. Your camera expert should be comfortable helping the group out taking photos. A parent or carer with a penchant for photography may be just the person to ask! Make sure you know who in your group is happy to be photographed.
- In the previous session, talk with everyone about the kit they’d wear or bring along on nautical adventures. These can be ones they’re currently taking part in or those planned for future sessions. Have everyone bring along to this session the kit that they have, and let them know what you have available to lend for this activity if they don’t have everything. Remind them to label any personal property with the owner’s name.
- Bring along a few examples of life jackets and buoyancy aids to the session. If you don’t have any, local sailing or boating clubs may be able to lend you some, or people in the group might have their own if they’re keen on watersports.
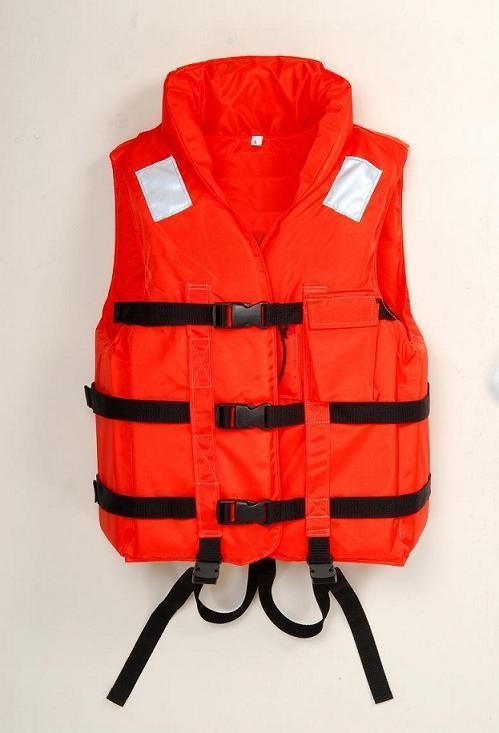
Life jacket
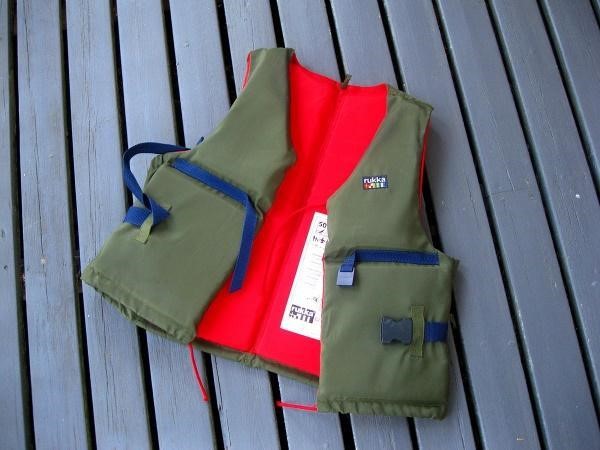
Buoyancy aid
Run the activity
- Clear some space in the activity area. There will need to be enough space for everyone to lay out their aquatic adventure kit for the scenes they’ll be photographing.
- The person leading the activity should bring forward a life jacket and buoyancy aid. See if anyone can explain the difference between the two. Make sure that each photo taken features the person with the kit wearing the correct floatation device. A life jacket is designed to keep the wearer afloat, by holding the head out of the water. This makes swimming quite difficult. A buoyancy aid allows the wearer to move in the water easier.
- Split into small groups. Each person should have the kit that they’ve brought along or that they borrowed for this activity.
- Anyone working towards their Nautical Skills Staged Activity Badge should be given the opportunity to talk through why they’ve brought the kit they have in some detail.
- Groups should begin to discuss how each person could use their kit to recreate on land the activity it’d be used for on water. Give each group a sheet of blue tarpaulin to represent water. They could use any other bits and bobs lying around, such as clean, dry recycling, as props.
- You could suggest overhead shots to make things easier. The kit and props could then be laid out flat. People shouldn’t need to stand upright, but lie down on the scene. However, make sure this is carried out safely and risk assessed.
- Check out our Bedsheet backdrops activity if anyone would like to get extra creative with their scenes and there’s some time spare.
- When taking their shots, each group should make sure they understand how to use the camera properly and be sure that they handle it with care. For best results, they should set up each scene somewhere light enough to capture all the detail.
- Continue until each person in the group has shot their scene re-enacting an adventure using their kit. For each piece of kit used, the person should explain to their group what it’s for and how it helps them with the activity being demonstrated.
- When everyone’s got a picture they’re happy with, tidy away the props and tarpaulin sheets. Then give personal property back to owners.
- Before everyone leaves, take some time to discuss whether everyone thinks they have everything they need for the adventure they’re taking part in or preparing for. Talk about where items that someone needs might be found.
- Scouts still get a great discount at GO Outdoors if anyone’s looking to buy any new kit for their nautical adventure.
Reflection
Turning up to your activity with the correct clothing and equipment makes a big difference to how much you’ll enjoy taking part. Sometimes, it helps to run through things beforehand with someone to make sure you have everything you need. Why is it important for everyone in the group, not just yourself, that you take part with the right kit?
Everyone should have a chat about other ways you can help one another prepare and be responsible when spending time out on the water. Checklists, posters, mnemonics and other resources could be prepared to make sure that everyone remembers to bring everything and enjoys their experience. Why might these be more helpful than simply telling someone to bring the kit?
Safety
All activities must be safely managed. You must complete a thorough risk assessment and take appropriate steps to reduce risk. Use the safety checklist to help you plan and risk assess your activity. Always get approval for the activity, and have suitable supervision and an InTouch process.
You must run your activities in line with the Safeguarding Code of Conduct for Adults (Yellow Card) and report any concerns to the UK HQ Safeguarding Team.
- Phones and cameras
Make sure parents and carers are aware and have given consent for photography.
- Rubbish and recycling
All items should be clean and suitable for this activity.
- Scissors
Supervise young people appropriately when they’re using scissors. Store all sharp objects securely, out of the reach of young people.
Using a more advanced camera could allow the group to play with more camera techniques when shooting their scenes. Many phones and other devices also have image editing software that could be used to extend the activity. This could be especially useful for anyone working towards their Cubs or Scouts Photographer Activity Badge.
- A leader should be sure to remind the group that they don’t have to have their photo taken if they’re uncomfortable with this, or not permitted to do so. They can still set up a fun scene and talk everyone through their equipment.
- Make sure borrowed equipment is available in a range of shapes and sizes to suit the needs of everyone in the group.
All Scout activities should be inclusive and accessible.
If the group enjoyed getting to grips with using the camera, you could all think about how photographs can be taken to capture and document them taking part in the activities themselves. It’s not always suitable to take photos while out on the water, but how about taking photos of friends from the shore? For more guidance on watersports photography, here are some tips from ePHOTOzine.
This activity is a chance for young people to share and talk about their interests in a creative way.