
Make homemade weather stations
You’ll need
- Specific equipment for each base (see instructions)
Before you begin
- Use the safety checklist to help you plan and risk assess your activity. Take a look at our guidance to help you carry out your risk assessment, including examples.
- Make sure all young people and adults involved in the activity know how to take part safely.
- Make sure you’ll have enough adult helpers. You may need some parents and carers to help if you’re short on helpers.
Planning and setting up this activity
- This activity works best as five bases.
- It may be easiest to set up the bases before people arrive. We’ve included a list of what you’ll need at each base, and how much you’ll need for each group.
- You may want to print the information about each craft to leave at each base or you may want an adult at each one to show people what to do.
- We think each group will need about 10 minutes at each base, however feel free to adjust it to suit your group. You may need to remind groups to move on.
Running this activity
- Gather everyone together. Tell everyone that weather is a description of what the conditions are like in a particular place.
- Ask if anyone knows what a weather instrument is.
- Explain that a weather instrument helps us to measure the weather. For example, an anemometer measures wind speed, and a thermometer measures temperature. A wind vane shows which direction the wind is coming from and a rainfall gauge measures precipitation (rainfall).
- Tell everyone that they’ll be making their homemade weather instruments in groups. Each group will bring their weather instruments together to make their own weather station.
- Ask everyone to get into five groups. The groups should move around the bases until they’ve made all three parts of their weather station.
- At the end, gather everyone back together. Ask if anyone knows what climate is. Explain that climate is a description of the average weather conditions in a certain place for the past 30 or so years. Different areas of the world have different climates. We call these climate zones. The climate in an area can be affected by the landscape, relief and activities taking place (both human and natural). Climate can alter over time and space.
- Ask if anyone knows what a microclimate is. Tell everyone that a microclimate is the climate for a very small or restricted area, especially when this is different from the climate of the surrounding area. For example, the climate might vary from place to place on a hill, such as at the top of a hill, the sunny side of a hill, the shaded side of a hill and the bottom of a hill. These areas have small variations in their climates over a short distance due to surrounding factors, such as trees, water or roads.
- If you wish to, you could use your weather stations to test the microclimate of your venue. Each group could place their weather station in a different zone of your venue, then collect them again the following week to see how similar or different the results may be.
Make a wind sock
You will need
- One bamboo cane for each group
- A cardboard tube for each group
- Some coloured paper, glue stick
- Coloured pens and pencils
- String
- Scissors
- A wind sock’s a very simple tool that shows the direction and (relative) speed of the wind.
- You often see wind socks in action at airports because they’re a quick and easy way for pilots to check the wind and how it’ll affect their take-off and landing.
- If the wind’s too strong, or if it’s blowing across the runway, the pilot might not be able to take off. If the wind’s blowing towards the plane, it’ll help the wings create lift and the plane will take off more quickly. When pilots land into the wind, the plane slows down more quickly.
- Wind socks only show relative speed – you might be able to tell if it’s windier than yesterday, but you won’t be able to get an exact measurement.
- More complex instruments can give the exact speed of the wind – you may have seen an anemometer (the long word for a device that measures wind speed and direction) that uses small cups, fans, or even sound waves.
- Anemometers are trickier to build because they need to be calibrated – set up so they measure correctly.
- Cut the coloured paper into strips.
- Glue one end of a strip and stick it to the end of the tube. Attach more strips, until there are strips the whole way around the edge of the tube (around the circumference).
- If you want to, now’s the time to decorate the tube. You may want to add a team name or shapes cut from paper, but it’s not essential.
- Cut a hole about one centimetre from the other end of the tube (the end without paper strips attached). Cut another hole opposite it.
- Tie a short piece of string between the two holes so it goes through the middle of the tube.
- Cut a piece of string to about 45cm long. Tie one end to the middle of the piece of string in the middle of the tube.
- Tie the other end of the long piece of string to the top of the bamboo cane.
- Push the bottom of the bamboo cane into the ground so it stands up. If you can’t do this, attach it to something heavy, for example, a full water bottle or a tin can filled with sand.
- See how well the windsock works. Does it show direction and (relative) strength of the wind?
Make a thermometer
You will need
- A clean plastic bottle for each group
- A thin clear tube (such as a plastic or reusable straw, or an empty biro ink tube)
- Sticky tack
- Sticky tape
- Food colouring
- Marker pen
- Water
- Thermometers measure temperature. They come in all sorts of shapes and sizes because they’re designed to measure the temperature of different things.
- The first thermometers used liquid in a glass tube. When the temperature changed, the liquid would expand or shrink in a predictable way, so markings showed people what the temperature was when the liquid was at that level.
- Modern thermometers measure changes in electrical resistance in a piece of metal – this detects temperature change. People can read these thermometers instantly and they can be much more accurate.
- Add a few centimetres of water to the bottom of the plastic bottle, then add a few drops of food colouring and mix it together well.
- Put one end of the clear tube into the bottle – the end needs to go into the water without touching the bottom of the bottle.
- Use sticky tack to seal the top of the bottle around the tube and hold it in place. The top of the straw should poke through the sticky tack.
- Take the thermometer outside to calibrate it. Use a marker pen to mark the level of water in the tube. Look at a weather forecast to get the temperature, and write that down too. If you can’t write it on, attach a piece of paper or card to it and write on this instead.
- If you can, take the thermometer somewhere else, perhaps next to a radiator where it’s warmer. You should see that as the temperature increases, the water heats up, expands, and rises up the tube. When it gets colder, the water takes up less space so won’t reach as far up the tube.
- Explore different ways to get hold of a weather forecast – how might you get a more exact reading? You might think about searching online, checking a newspaper, or looking at an app.
Make a barometer
You will need
- A glass jar for each group
- A balloon for each group
- Sticky tape
- A4 card
- Marker pens
- Scissors
- Straws
- A barometer measures changes in air pressure.
- Changes in air pressure can help predict weather changes.
- Air pressure’s also important for planes as it decreases a lot as they rise higher into the air; this affects their engine performance and the lift generated by their wings.
- A modern barometer works like the one people will make in this activity – they’re just smaller! They use sensors to measure the movement of the materials then they convert the movement into a digital display.
- Cut the stem off the balloon.
- Stretch the rest of the balloon over the top of the top of the jar so it’s totally covered and sealed. Use sticky tape to make the bottom secure.
- Cut one end of the straw diagonally, so the end’s pointy.
- Use a short piece of sticky tape to attach the other (non-pointy) end of the straw to the top of the balloon, so it goes sideways (parallel with the floor). It’s important not to use too much tape, as the balloon needs to be able to expand and shrink as the pressure changes.
- Attach a piece of stiff card to the jar so the end of the straw is in front of the card. Make sure there’s space on the card above and below the end of the straw. If you can leave your barometer in the same place, it may be easier to attach the card to a wall instead.
- Use a pen to mark where the pointed end of the straw reaches on the card. You could calibrate the barometer by checking the air pressure on a weather forecast and jotting it down alongside the mark.
- If you can, look at your barometer later on. If the air pressure’s risen, the pressure of the air outside the jar will be higher than the pressure of the air inside the jar; it’ll push down on the balloon lid, and the straw will point up. If the air pressure’s lowered, the pressure of the air outside the jar will be lower than the pressure of the air inside the jar; the balloon will swell outwards and the straw will point down.
Make a hygrometer
You will need
- Two small thermometers (available online or from pet shops)
- Cotton wool balls or thin cleaning cloth (for example, J-cloth)
- Clean, empty plastic bottles (500ml)
- Sticky tape
- String
- Scissors
- Access to water
- Access to the internet
- A hygrometer measures humidity. Humidity’s the amount of water in the atmosphere – high humidity is what gives you that sticky feeling on a hot day.
- Humidity’s often measured as ‘relative humidity’ – the amount of water vapour in the air compared to the maximum moisture the air could hold. Fog is 100% relative humidity; humans are most comfortable with anything between 30% and 60% relative humidity.
- At this base, people will make a type of hygrometer called a psychrometer. Psychrometers are a ‘wet and dry bulb’ hygrometers: you calculate the humidity using temperature readings from two basic thermometers, one with a dry bulb and one with a wet bulb.
- Psychrometers work because evaporation from the wet bulb causes the temperature reading to drop so it shows a lower temperature than the dry bulb. You calculate the relative humidity by comparing the readings to the ambient temperature using a special chart or webpage.
- Take one of the thermometers and tie a cotton wool ball (or a small piece of cloth) around the bulb.
- Pour some water on the cotton wool or cloth to turn this thermometer into the wet bulb thermometer.
- Tie some string around the neck of the plastic bottle. It should be really tight so it won’t come loose.
- Tape the wet bulb thermometer to one side of the bottle.
- Tape the other (dry bulb) thermometer to the opposite side of the bottle. Make sure both thermometers are really secure – it might be best to use a couple of extra pieces of tape.
- To take a measurement with the finished hygrometer, hold onto the string and whirl the whole thing around for around about a minute.
- Take readings from both thermometers. Put them onto a webpage like this one to work out the relative humidity.
- Depending on how much equipment you have, people may need to dismantle the hygrometer after they’ve taken a reading, so the equipment can be reused by the next group.
Make a rain gauge
You will need
- Clean, empty plastic bottle (two litres)
- Scissors
- Stones, pebbles or marbles
- Access to water
- Ruler
- Permanent marker
- A rain gauge measures rainfall. If you’re feeling fancy, you could also call it a pluviometer or an udometer, but most people just call it a rain gauge.
- Rain gauges have been used for thousands of years to help people create basic weather forecasts. Tracking the amount of rainfall meant people could work out when to plant and harvest crops.
- The Greeks were using rain gauges back in 500BC, but the first modern rain gauge wasn’t invented until 1662. Christopher Wren invented the tipping bucket rain gauge – he’s also known for rebuilding St Paul’s Cathedral after the Great Fire of London.
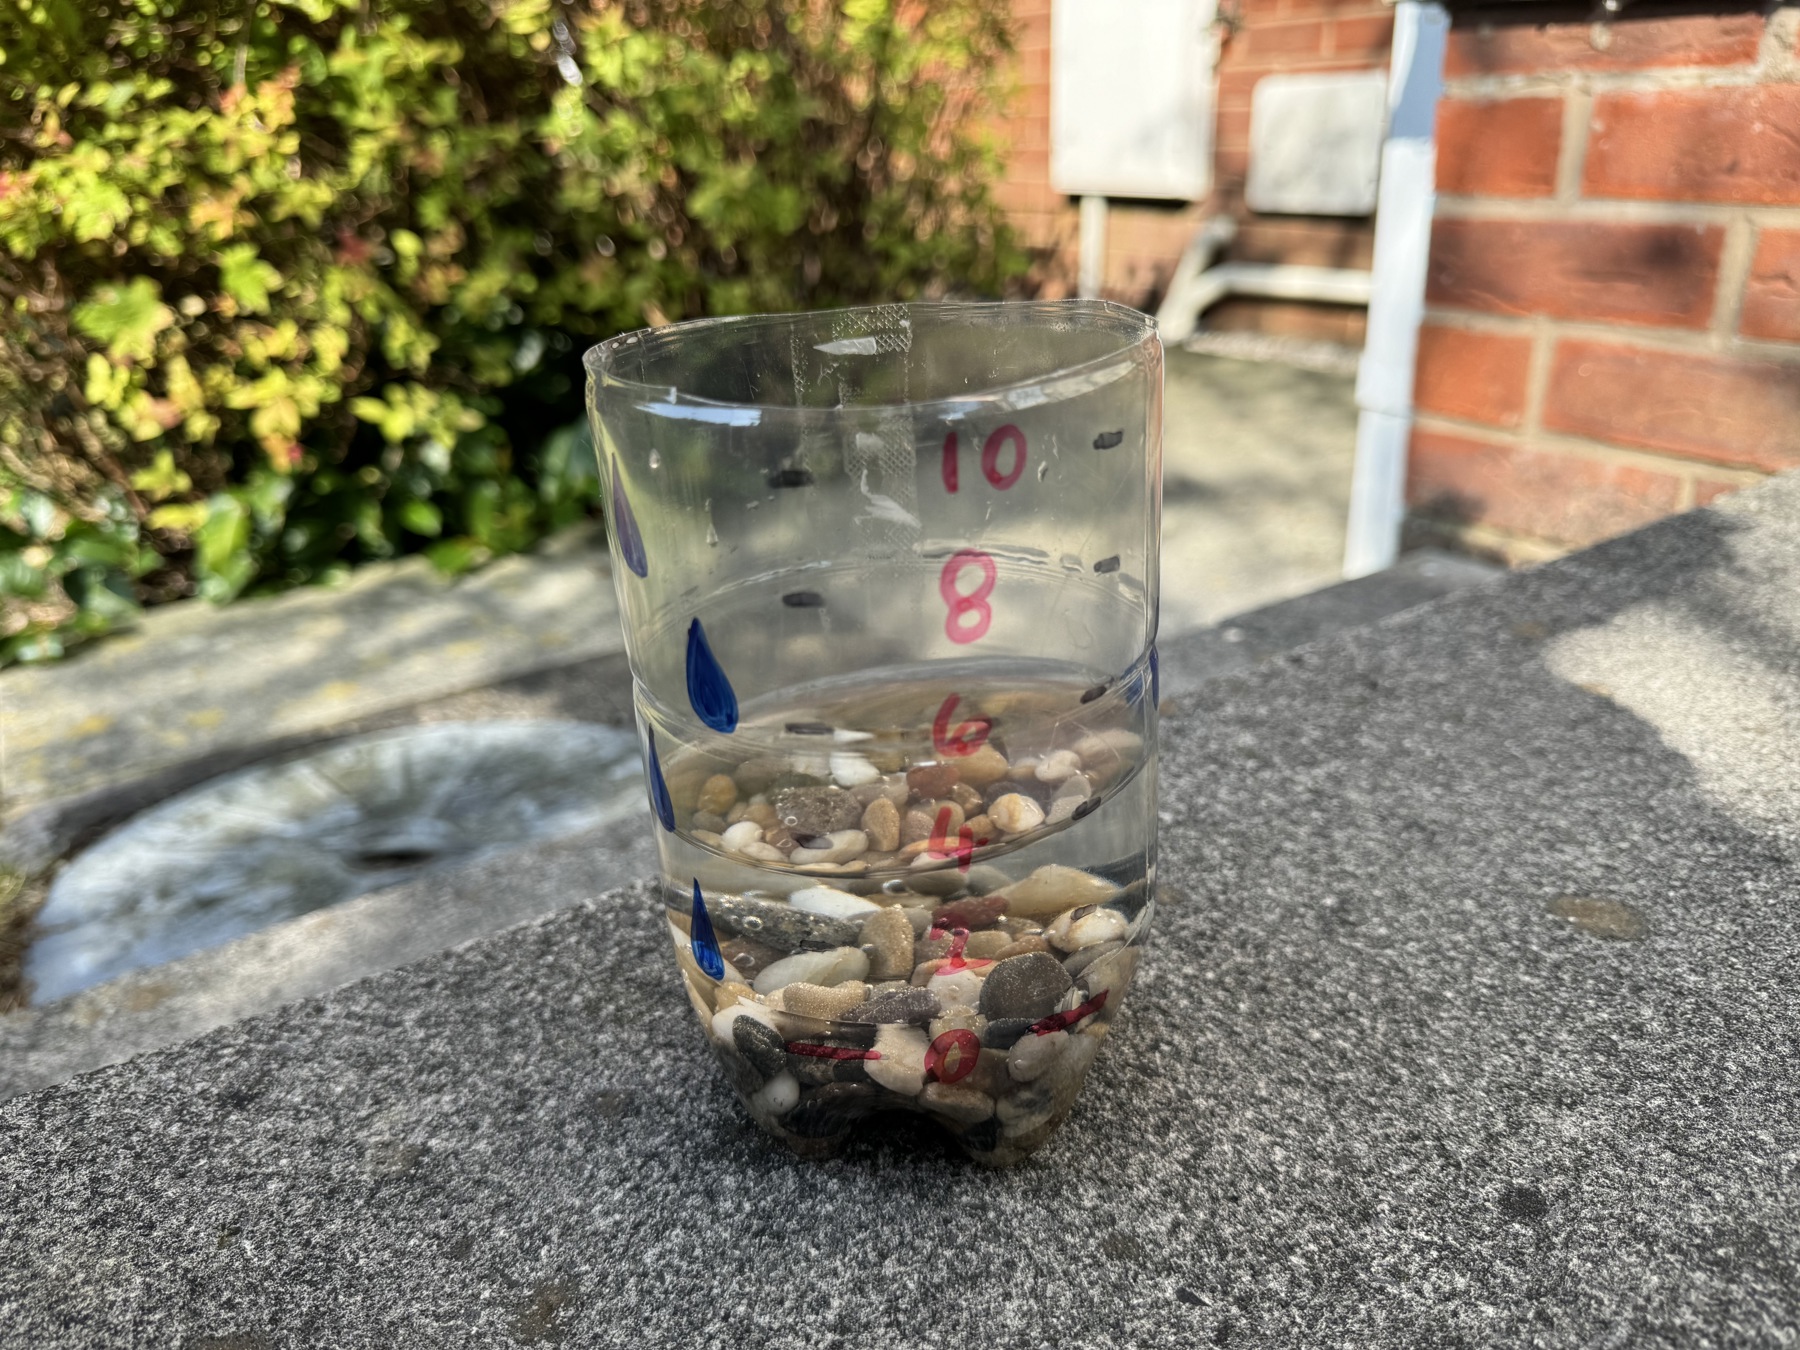
- Cut about 10cm from the top of the bottle, to remove the neck. You should end up with a cylindrical container that has the same diameter (thickness) from top to bottom.
- Fill the base of the bottle with a small layer of stones, pebbles, marbles or any other small, heavy items that won't absorb water. This will weigh the bottle down so it doesn't blow over.
- Fill the base of the bottle with a little water, to create a flat starting line just above the base of the bottle. The starting line should be above any indentations in the base of the bottle.
- Create a scale by lining a ruler up against the bottle, so the ‘0’ mark is alongside the flat line of water.
- Draw a dotted line around the bottle at the ‘0’ mark, then continue to mark small lines on the side of the bottle every centimetre.
- Every five centimetres, mark a slightly longer line and write the number of centimetres it corresponds to.
- To use the rain gauge, place it on level ground under open sky (sloping ground or trees will skew the measurements).
- At the same time every day, check how much water has filled the bottle and plot this number on a graph. After you’ve taken the measurement, tip out the excess water so the water’s level with the 0cm mark again.
Reflection
This activity was all about developing skills. People used practical skills to make their weather station, as well as working together as a team. How do weather stations help pilots prepare to take off or land? When else might it be useful to know about the weather conditions in advance? People might think about making plans with friends (if it’s a rainy day, you may want to do something inside) or going on a hike (you’ll need to know what to wear and pack). Can anyone think of another time it’s useful to prepare? People might think about schoolwork, practising skills like sports or instruments, or even thinking about their futures.
This activity was also a chance to value the outdoors. How does the weather affect how people engage with the outdoors? Does being able to predict the weather make it easier to enjoy being outside? Did learning more about how weather forecasting works help people feel connected to the natural environment?
Safety
All activities must be safely managed. You must complete a thorough risk assessment and take appropriate steps to reduce risk. Use the safety checklist to help you plan and risk assess your activity. Always get approval for the activity, and have suitable supervision and an InTouch process.
You must run your activities in line with the Safeguarding Code of Conduct for Adults (Yellow Card) and report any concerns to the UK HQ Safeguarding Team.
- Scissors
Supervise young people appropriately when they’re using scissors. Store all sharp objects securely, out of the reach of young people.
- Glue and solvents
Always supervise young people appropriately when they’re using glue and solvent products. Make sure there’s plenty of ventilation. Be aware of any medical conditions that could be affected by glue or solvent use and make adjustments as needed.
Increase the level of challenge by trying to calibrate the equipment finely. You’ll need to pay attention to detail and go back to your equipment in different weather conditions, using a weather forecast to add different temperatures or pressures.
- Teams should work together and support each other – if someone finds using scissors tricky, for example, they could focus on another job.
- If lots of people will struggle with the finer tasks such as cutting the paper strips, you could do them before you begin.
All Scout activities should be inclusive and accessible.
If you can, find somewhere to keep your thermometer and barometer – away from direct sunlight is best – or your rain gauge. Keep coming back to check them, take note of readings, and see how the readings relate to different weather conditions. Over time, you may even be able to create basic weather reports. This will help you meet requirement 2 of the Scouts Meteorologist Activity Badge.
Asking questions and finding your own way of doing things is a great way to further your understanding. If you’re not sure about something, or if an adult doesn’t know the answer to your question, you could look things up and build your researching skills as you find the answer.