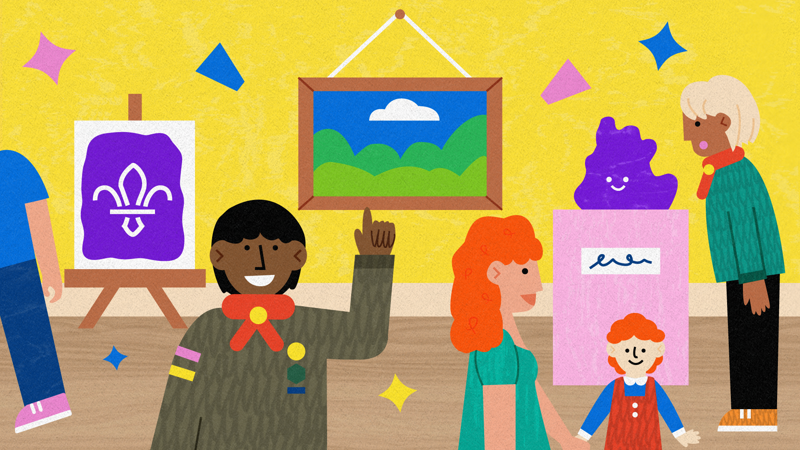
Show your art to grow your art
You’ll need
- Scrap paper
- Coloured pens or pencils
- Sticky tape
Before you begin
- This activity might not be for everyone as the artists make their artwork at home. It’s OK if only some people want to create the art.
- You’ll need a slot in your regular meetings for people to show their art and get feedback. It’s up to you when you plan this in – you might find it’s less rushed to do it at the start.
- How long this activity takes will depend on how many artists want to get involved. There’s no right or wrong length – and it’s up to you how many people show their art each week.
- Plan a date for the final exhibition well in advance, so it’s easier for parents and carers to make it.
- To get their Artist Activity Badge, young people just need to ‘show a selection of their own recent work’. Having an exhibition is a really nice way to do this, but if it’s not possible, it could be enough for everyone to show their work to the rest of the group in a meeting. You could do this during an online session. Check out the advice on using Zoom and other popular digital platforms and the guidance on being safe online.
Make the art
- Each artist should choose a film or book as the theme for their art.
- Each artist should make three works of art – one should be a scene from the story, another a person or object from the story, and the third a landscape from the story. It’s up to each person which techniques they use.
Each artist can choose which order they make their works. They don’t have to start with the scene if they don’t want to.
- The artists should work with the person leading the activity to agree a schedule to show their work to everyone else. If there are lots of artists, it may be a bit overwhelming (and take too long) to do it all at once.
It’s best for the artists to show one work at a time. Then, they can use the feedback to help them create their next masterpieces.
Get some feedback
- The artists should show the group their work. They may want to explain a bit about it, for example, who a character is – but they should keep it spoiler free in case anyone hasn’t read or seen the book or film yet!
- Everyone should take a scrap of paper for each work of art they’ve seen. They should write the artist’s name at the top of the paper, and then two things they like about their work of art.
- Everyone should write one idea for improvement for each work of art. They should remember to keep it kind and constructive and shouldn’t compare different artists’ work.
An adult could quickly check through all of the comments if they think there’s a chance that some could be hurtful.
- Someone should collect the scraps of paper and give them to the artist. It’s up to the artist whether they want to look at them right away or save them for later.
- Each artist should show at least three works of art – their scene, their person or object, and their landscape. They may want to show more, for example, if they make any improvements or redo any pieces.
Plan the exhibition
- The artists should decide which of their masterpieces they’d like to exhibit. It’s nice to use the ones they created and shared with the group, but they could add in anything else they’re proud of (and don’t have to share what they created in this activity, if they don’t want to).
- Everyone should work together to plan a date and how they’ll set up the gallery. Do they want to end a meeting early so there’s time, replace a meeting with the exhibition, or choose another day?
- Everyone should work together to make some posters or leaflets to invite parents, carers, and friends to the exhibition. They should include all of the important details such as location, time, date, and accessibility information.
This is a great chance to get creative – drawings, stencils, or lettering could all work.
- Everyone should give out the leaflets to invite people to the exhibition. It’s up to the artists who they ask to come – they may want to think about family and friends.
Remember to hand these out with plenty of time so people have a chance to sort out logistics such as transport.
Exhibition time
- Everyone should arrive with plenty of time before the exhibition starts to help set up.
- Everyone should work together to display the artwork, remembering to be careful with people’s work. It’s up to the artists what they use – they could use washi tape, string, or sticky tack.
- If they want to, the artists could write a title or short description to go next to each piece.
- Everyone should work together to welcome guests and show off everyone’s talents. The artists may want to explain some of their masterpieces to guests.
Reflection
This activity was all about trying new things. When people develop art, they give new things a go – sometimes things work, and sometimes they don’t. It can feel uncomfortable to do something unfamiliar, such as using a new medium or showing people works of art. How did the artists feel when people reacted to their work? As artists grow and get more experience, their art usually changes too. Did anyone try anything new in this activity?
This activity also needed the artists to persevere more. Did the artists find it hard to create three pieces of work one after another? Did everyone find it easy to keep giving good quality feedback week after week? Did anyone come up against a problem or issue during this activity? People may have found it frustrating using a particular medium, or they may have had some unexpected feedback. What helped them to get back up and try again?
Safety
All activities must be safely managed. You must complete a thorough risk assessment and take appropriate steps to reduce risk. Use the safety checklist to help you plan and risk assess your activity. Always get approval for the activity, and have suitable supervision and an InTouch process.
You must run your activities in line with the Safeguarding Code of Conduct for Adults (Yellow Card) and report any concerns to the UK HQ Safeguarding Team.
People could set themselves time limits or artistic restrictions (such as using a new medium) to really increase the challenge if they’re already comfortable with one way of making art.
Anyone should feel free to give this badge a go. It doesn’t matter if they think they’re ‘good’ at art – the whole point is that the artists are creative, give it their best shot, and learn loads.
If it isn’t feasible for some people to make art between meetings, you could set aside some time during meetings for them to give it a go. You may also want to consider loaning some of your group’s art materials if people don’t have things at home, or looking into after school clubs that may be able to help.
People could explore accessible ways of making art, for example, tactile art. They could take inspiration from an activity such as ‘Feel the view’ and make art using clay or other textured materials. They could even explore building texture with paint (or by adding things to paint).
All Scout activities should be inclusive and accessible.

Gather inspiration for works of art (and how to hold an exhibition) by heading to a local art gallery or an art exhibition, for example, in a museum. Plenty are free, or you may be able to get a special deal as a group or charity.
You could also consider using your exhibition as a fundraiser for a cause important to you. This would link with the 'Take Action' requirement of the Community Impact Staged Activity Badges.