Fantastic elastic flying machines
You’ll need
- Drawing pins
- Craft materials (for example, tissue paper, pipe cleaners, stickers)
- A4 paper
- Scissors
- Sticky tape
- Rulers
- Elastic bands
- Pens or pencils
- Coloured pens or pencils
- PVA glue
- Paper clips
- Pliers
- Cotton bud
- Plastic drinking straws
- PET plastic (for example, a two litre drinks bottle or disposable cup)
You will also need to print copies of the ‘Propeller pattern’ sheet. This one has been created by Science Toy Maker and inspired the activity below.
Propeller pattern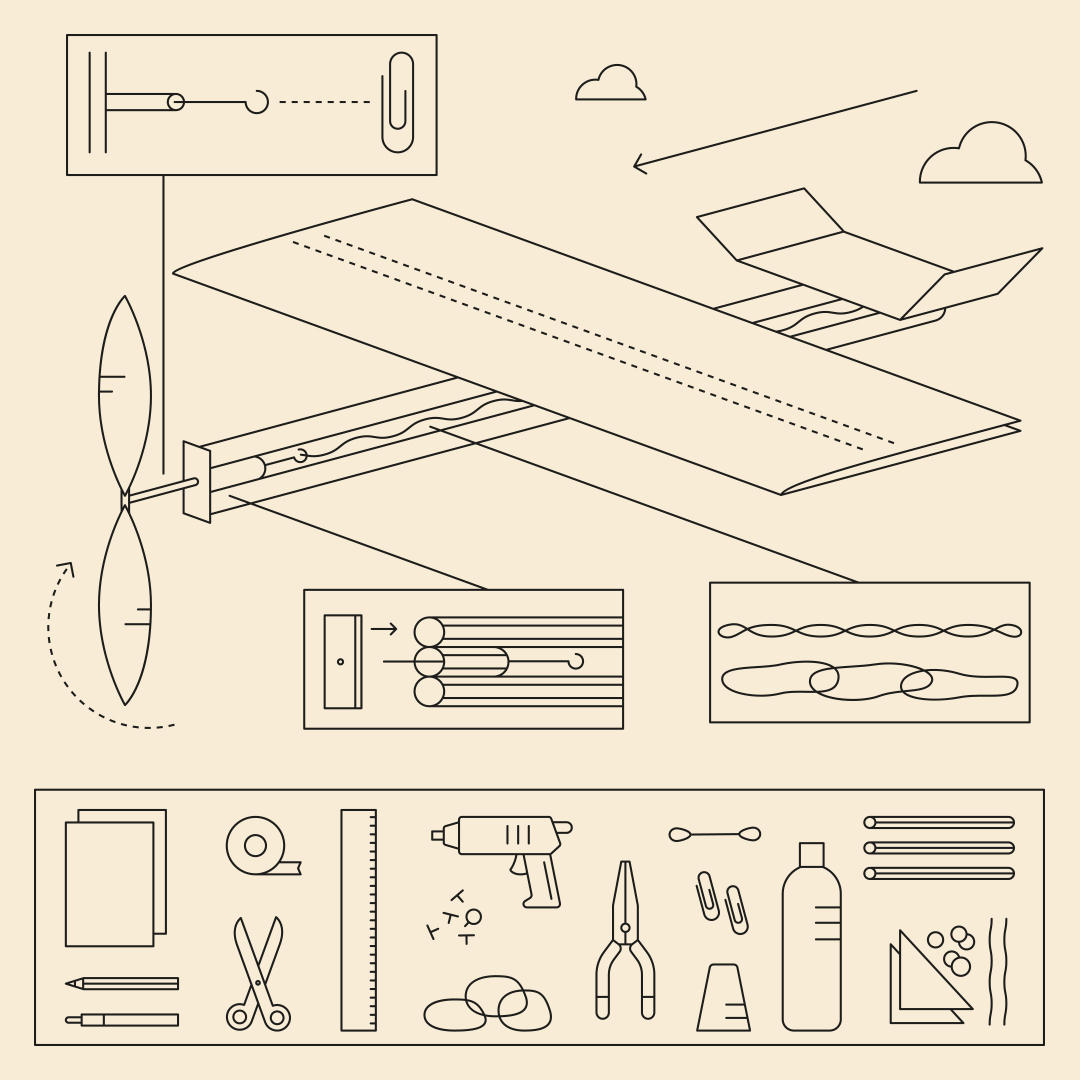
Before you begin
- This is a great activity to run during an online session. Check out the advice on using Zoom and other popular digital platforms and the guidance on being safe online.
- Let everyone know what you'll be doing in advance and send them a copy of the diagram or a link to this activity and ask them to print a copy or have the webpage open. Explain that parents and carers may need to help their young person with this activity.
- Think about how you’ll make sure everyone has the equipment they’ll need. You know your group best: some people have been dropping equipment packs at people’s doors while others have been sending links to buy things online.
- PVA and similar glues need time to dry before models can be flown, so you’ll need to factor this in; you may need to run this activity over several sessions if you need to wait for the glue to dry.
Run the activity
- The person leading the activity should welcome everyone to the meeting and mute them.
- Everyone should show that they have the diagram, some PET plastic, a ruler, a pen and scissors.
- The person leading the activity should show everyone how to complete each step of the instructions. They should remind everyone that they can look at their sheet or webpage to help them.
Try to do each step so it’s on camera. Give everyone time to copy and catch up before you move on to the next step.
- Once everyone has their finished model they should decorate and personalise it.
- Everyone should tidy up and recycle any leftover materials. If they used PVA glue, they should put the model to one side and only move on once the glue is dry.
- Everyone should have a test flight of their model – they’ll need a large indoor or outdoor space. They should wind up the tension in the propeller and throw the model into the air.
- As the models soar through the sky, everyone should look for any design flaws. Do they need to change the position of the main wing to improve balance? How many times did they rotate the propellor? Could they tweak the shape or size of the tail wing?
- Once everyone’s made any adjustments they should try to let their aircraft fly again. They should try to time how long their aircraft stays in the air and how far it travels so they can compare results with their friends.
Instructions: how to make the model
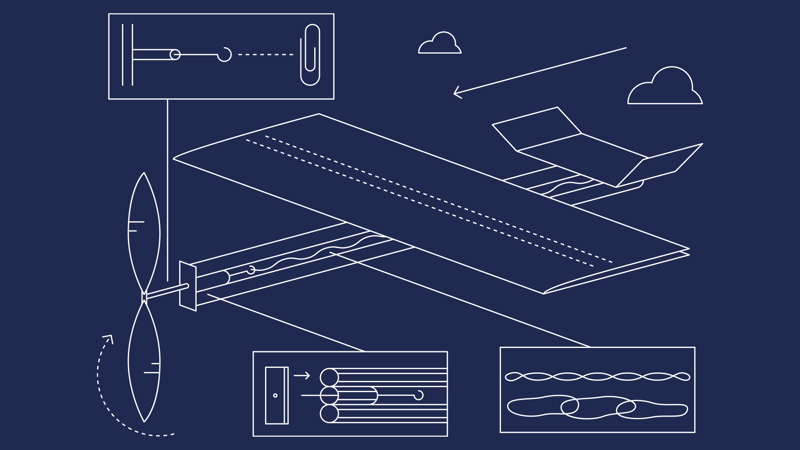
Build the Propeller
- Cut the top and bottom from a PET plastic cup or bottle then cut down one side of the cylinder. Unroll the plastic and lay it flat.
- Draw the outlines of two propellers with rounded edges using a felt pen. They both need to be about two centimetres wide and nine centimetres long. Cut out the plastic propellers.
- Take a cotton bud. Remove the cotton swabs from the ends, so that you’re just left with the stick. Cut a section about one and a half centimetres long from one end and put it to one side for now.
- Mark the centre point on the longer piece of plastic stick. Use glue to attach the propeller blades to either end of the stick, leaving a small space in the middle. Attach one of the blades tilted at a 45-degree angle and the other straight.
- Take the hollow one and a half centimetre piece of stick from step three and glue it to the centre point, in the small space between the propellers, to make a T-shape.
- Dab some glue on the straight end of the paperclip (made in section 2), and slot the one and a half centimetre piece of hollow plastic stick at the centre of the propeller over it. Make sure this is securely glued in place.
- Finally, you will attach this propeller to the fuselage later using the paperclip hook (built in section 2).
Prepare the Rubber Band Mechanism
This mechanism powers the propeller by storing energy and releasing it.
- Take a paperclip and pliers. Carefully bend the clip into a hook to hold rubber bands.
- Once the fuselage is built in section 4, you will attach this hook at the front to hold the propeller assembly.
- Tie three rubber bands together. Check the length of your bands pulled taut against that of your fuselage. If they match, attach one end of the rubber band chain to the paperclip hook.
- Thread the other end through the small straw piece at the back of the fuselage, pull taut, and secure it with a small paperclip or similar. Use glue or tape to make sure it stays in place without bending the fuselage.
- Keep the tension in the rubber bands as you do this. At the same time, don’t pull them so tight that they bend the fuselage out of shape. If your bands are too short or too long, you may need to use a different number.
Build the Wings
The wings provide lift and stability during flight.
- Take some A4 paper to make your wings. Fold it in half lengthways. Unfold it and use the ruler to mark the middle of the page.
- Take a straw and use the ruler to mark the middle. Use tape to attach it to the paper so that the two marks line up, with the straw running parallel two to three centimetres from the fold line on either side of the page.
- Add some glue along the top of the taped-down straw. Re-fold the paper and stick the other side down on top of the straw. Glue or tape the corners and edges of the sheet together to complete your wing.
- Mark the centre point on the wings you made earlier. Line up the centre precisely with the fuselage and glue the wings to it. Try to fit them about 12 centimetres from the propeller for the best balance.
Build the Fuselage (Body)
The fuselage is the main structure of your plane, holding all parts together.
- Take four straws to make the main body of the plane. Insert the ends of two straws into the other two to create two double-length straws.
- Take a fifth straw and cut two pieces, each about two centimetres long. Dab some glue on the sides of each piece and use them to connect the two double-length straws at their ends.
- Take some leftover PET plastic, push a drawing pin through it, and cut out a one centimetre square with the pinhole in the centre. Glue this square to one end of the fuselage without blocking the hole.
- Take the paperclip hook (from section 2) and push the straight end through the front of the plastic square. The hook should now sit between the two long straws. Rotate the straight end clockwise and anti-clockwise to make sure it turns freely without catching on the straws.
- Adjust the width of the hook if necessary, to make it fit.
Build the Tail Wing
The tail wing helps with stability and control.
- Take another sheet of A4 paper and fold it lengthways in half to create the tail wing.
- Cut a rectangle measuring approximately 16 by 8 centimetres from the folded side of the paper. Mark the centre and fold the short edges to meet in the middle.
- Glue the tail wing to the back end of the fuselage to complete the build.
Final Assembly and Testing
Now that all parts are built,
- Attach the propeller assembly (from section 1) to the paperclip hook on the fuselage (section 4).
- Connect the rubber band mechanism (from section 2) so it can wind the propeller.
- Glue the wings (from section 3) and tail wing (section 5) securely in place.
- Once assembled, decorate and personalise your plane.
- Test fly it in a large indoor or outdoor space. Observe how the parts work together during flight. Adjust the wing position or propeller tension as needed to improve performance and balance.
- Propeller: generates thrust by spinning and pushing air backward.
- Rubber Band Mechanism: stores and releases energy to power the propeller.
- Wings: create lift to keep the plane airborne.
- Fuselage: provides structure and balance.
- Tail Wing: adds stability and control.
Reflection
This activity involved making lots of components from plastic. This included straws, plastic cups and plastic bottles. What other repurposed materials or other alternatives could be used to replace each component? Can you think of viable alternatives, with the same or similar properties, to all the plastic parts? What else might you need to change if you’re using denser or weaker materials instead? Can anyone come up with a design that’s entirely eco-friendly?
Like plastic, air travel has a bad reputation, as it’s a key contributor to our carbon footprint. Burning jet fuel for thrust creates carbon dioxide, which when released into the atmosphere can increase global warming. What are some other ways we could travel that have less carbon output? If flying’s unavoidable, how could you make up for the carbon emissions from the flight? A clue: some organisms like to eat carbon dioxide!
Safety
All activities must be safely managed. You must complete a thorough risk assessment and take appropriate steps to reduce risk. Use the safety checklist to help you plan and risk assess your activity. Always get approval for the activity, and have suitable supervision and an InTouch process.
You must run your activities in line with the Safeguarding Code of Conduct for Adults (Yellow Card) and report any concerns to the UK HQ Safeguarding Team.
- Glue and solvents
Always supervise young people appropriately when they’re using glue and solvent products. Make sure there’s plenty of ventilation. Be aware of any medical conditions that could be affected by glue or solvent use and make adjustments as needed.
- Scissors
Supervise young people appropriately when they’re using scissors. Store all sharp objects securely, out of the reach of young people.
- Sharp objects
Teach young people how to use sharp objects safely. Supervise them appropriately throughout. Store all sharp objects securely, out of the reach of young people.
- Buying parts like the propeller, hook or elastic could make the build easier. You can even buy rubber band-powered aircraft kits with all the materials and instructions you’ll need.
- Make sure everyone’s parents or carers know what you’ll be doing so they can support people as needed.
Make it accessible
All Scout activities should be inclusive and accessible.
If the group’s already learned about aircraft control surfaces (like ailerons, elevators and a rudder), they could add some to their model and see if they can fly it in a specific path or perform a trick like a loop-the-loop.
If the group’s enjoyed building their rubber band aircraft, they could look into building another model like an airship, hovercraft or round the pole aircraft model. They could contact a local club to help, like the British Model Flying Association.
Give everyone the chance to come up with unique decorations and designs and to alter their model based on their findings.