Take on a bridge building mission
You’ll need
- Pens or pencils
- Scrap paper
- Scissors
- Tables
- Tape measure
- Craft materials (for example, tissue paper, pipe cleaners, stickers)
- Weights, like coins
Before you begin
- You may wish to plan this activity across two sessions. Introduce everyone to bridges and the science involved in making them. Then, in the first session begin work on designs. In the second session, build and test the bridges.
- You can request a STEM Ambassador to help deliver science, technology, engineering and maths (STEM) activities in the programme. To get started, go to the STEM Ambassador website and register as a youth and community group, so you can share requests for support.
- Cut out the squares from the 'Bridge type cards' for each sheet.
Set the scene
- Set the scene with this mission brief:
‘An explorer is planning their next adventure and is looking for an enthusiastic team to help! Your team needs to help them navigate through the jungle and cross the river passing through it. You’ll need to design and build a portable bridge that can support you and your equipment whilst you cross the river. Before you embark on this adventure you need to build a model of your bridge and test it on a smaller scale.’
- Explain to everyone that the task requires them to come up with a design of a bridge to span a gap, using only the materials listed. If there’s time (doing everything may take two sessions), factor in the weight of each bridge, the budget each team has and include costs for the materials.
- Before everyone splits into groups, everyone should agree on some design feature rules for the bridges – namely, how wide the gap they need to span is. Everyone should come up with a replica river to the one you need to cross and agree upon how wide it is. This will show each team how long their bridge needs to be.
Other things that could be agreed upon include how much weight the team can carry, and thereby how wide and heavy the bridges are allowed to be. They could agree to use specific materials that are available, or to have an individual budget per team to spend on items from a pool of resources. Here’s a sample set of rules that you could follow: The bridge must span a gap of 30cm, be removable after crossing without leaving structures behind, be at least 10cm wide, within 30-60g in weight, and be able to carry up to 800g as a maximum load. Everyone should use the ‘Materials price list’, work around costs (for example, sticky tape - £100 per roll, string - £50 per ball) and have a £6,000 budget for the whole project. Points should be deducted from teams that overspend on equipment or produce bridges that are too heavy.
- Everyone also needs to agree upon what must’ve happened for a bridge to have failed. This could either be total collapse of the bridge or a certain amount of deflection in the centre of the bridge.
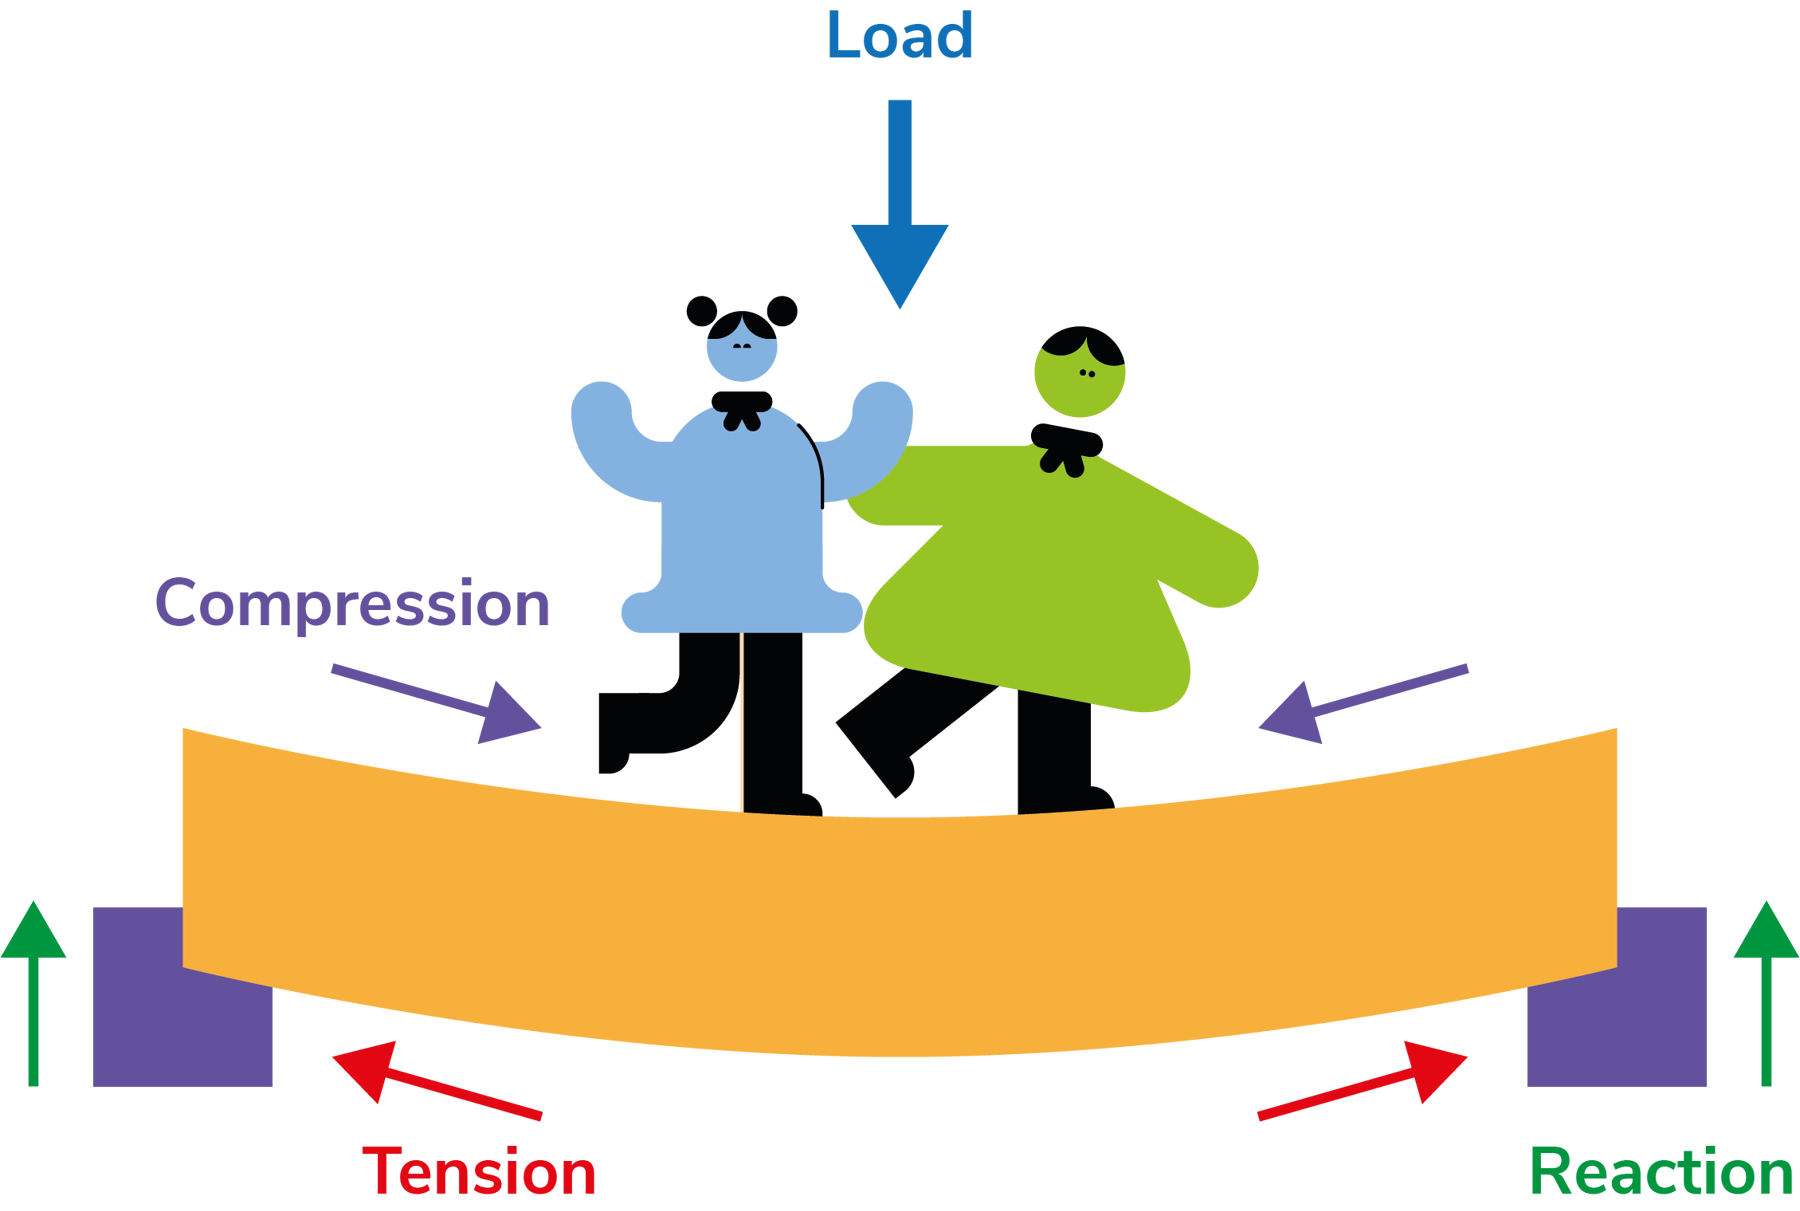
‘Deflection’ is a term engineers use for the amount a structure bows or moves under a load. This can be measured as a distance (from the original structure position) or by the angle created when the structure moved.
- The group should then discuss the different forces that act on a typical bridge. These are an important factor if you’re designing bridges that need to be able to bear a load without bowing or collapsing. Show everyone the image below to get them thinking about this:
Build your bridge
- Now that everyone’s clear on the kind of bridges they need to make, everyone should split into small groups of three or four people. Give each group their set of squares from the 'Bridge type cards' to pair up, and give them some inspiration as they try to come up with a bridge design of their own. Groups should use pens, pencils and paper to sketch their own designs.
- Each group should settle on a design by having each person create their own, individual designs, and then pooling them together, so that the best ideas can be seen by everyone and agreed upon. This is known as ‘divergent-convergent’ thinking. Hopefully, this should allow groups to produce bridges that use a combination of everyone’s best ideas.
- Once a finished concept has been drawn, teams should decide which materials will work best for their bridge design, how big they should make it and how the different parts should be made. Each person should be assigned specific tasks, whether that’s managing the budget, sourcing materials, construction or testing.
- Begin building the bridges, with each person in each team taking responsibility for their tasks.
- Once the building is completed, bridges should be tested to see that they meet the criteria set out by all the groups for all the groups. Bridges should be weighed to check that they’re light enough to be portable. Budgets should be checked against the total budget to see that no-one has overspent. Set up bridges one at a time on the replica river made earlier. The bridge should span the full width.
- Groups should take back their bridges and think of at least one thing they can change or improve to help the bridge meet the agreed-upon criteria. This may be a feature that failed under testing, or came close to failing. Ideas should be tested independently before being added to the finished bridge.
- Test the improved bridges to see how they do this time around. Groups need to decide whether their changes made a difference – for better or worse. In any time that’s left, groups should keep testing, trying new ideas or features and check their findings, until they can draw conclusions on the best possible materials, scale and features of their design.
Reflection
Building bridges to a specification required technical problem-solving skills. Think about which was the best design, why it was better and how you decided what to improve. Were there any other groups who designed a better bridge?
Teams assigned one another different roles to help with the bridge build. Did this give everyone in the group a more-or-less-even amount of work? Was this the most efficient way for you to work, or should different people have done different tasks?
Safety
All activities must be safely managed. You must complete a thorough risk assessment and take appropriate steps to reduce risk. Use the safety checklist to help you plan and risk assess your activity. Always get approval for the activity, and have suitable supervision and an InTouch process.
You must run your activities in line with the Safeguarding Code of Conduct for Adults (Yellow Card) and report any concerns to the UK HQ Safeguarding Team.
- Scissors
Supervise young people appropriately when they’re using scissors. Store all sharp objects securely, out of the reach of young people.
- Sharp objects
Teach young people how to use sharp objects safely. Supervise them appropriately throughout. Store all sharp objects securely, out of the reach of young people.
- Glue and solvents
Always supervise young people appropriately when they’re using glue and solvent products. Make sure there’s plenty of ventilation. Be aware of any medical conditions that could be affected by glue or solvent use and make adjustments as needed.
Make this task more or less complex in terms of bridge, budget and building criteria, depending on how much time you have. The more factors the groups have to think about, the tougher this activity becomes. Competitive groups may like to agree upon a scoring system, with bridges losing points for failed tests and exceeded budgets.
Team-assigned roles should be suitable for the person they’re given to.
All Scout activities should be inclusive and accessible.

You could make a larger-scale model of your bridge design, perhaps using some pioneering skills. Think about how forces, materials and features might need to be changed in the larger version and how you’ll make it safe. No pioneering projects should be undertaken without reading this safety advice.
Everyone agrees upon what rules and criteria to follow. Lots more factors, like the choice of materials, could also be chosen by young people.