Tripods ten ways
You’ll need
- Pens or pencils
- Scrap paper
- String
- Rope
- Pioneering poles
Before you begin
- If you want this activity to count towards the Scouts Outdoor Challenge Award, you’ll need to do it during a night away. This activity also works best at camp so people’s creations can be put to use.
- Check out Scouts’ pioneering guidance here. If you need to refresh your knot memory, check out Animated knots.
- It’s best to make sure everyone’s familiar with some basic knots and lashings before you get stuck in to making creative gadgets. Knot your average pioneer is a great way to practise – it also introduces the clove hitch, which is used to start the tripod lashing.
- If everyone’s been introduced to safe tool use, you may want to bring a basic tool kit so you can resize wood, rope, or string. Make sure everyone taking part, and their parents and carers, know beforehand. Check out Scout Adventures’ resources and follow our safety advice. If you want to run a tool safety session, Toolkit training might be the activity for you.
- You may want to gather some materials that people can use for inspiration. It’s up to you whether people are allowed to look online at sites like Pinterest and Scout Pioneering, or whether you just want to give them some print-outs or books.
- Pioneering’s all about making structures from poles. In different resources and diagrams, however, you might hear them being called different things.
- Generally, spars are thick, strong poles. Staves are a little smaller and thinner, and sticks are the smallest and thinnest of all.
- Throughout this activity, we’ll just refer to ‘poles’ to keep it simple and easy to understand. It’s up to you to choose a sensible size.
This lashing’s used to bind three poles together to make a tripod. The poles meet at the same point. Check out the Animated knot version here – it’s OK if you need to use images to help.
- Lie the three poles alongside each other.
- Tie a clove hitch around one of the outside poles.
- Wrap about six racking turns around the poles. The rope should weave in and out between them like extended figures of eight.
- Make two or three frapping turns around the racking between the spars. Frapping turns wrap around a lashing at a right angle to make it tighter. There should be two or three turns between the first and second pole, and another two or three turns between the second and third pole
- Finish with another clove hitch.
- Cross both outside spars to make a tripod.
Quick thinking
- The person leading the activity should show everyone an example of a tripod lashing.
- Everyone should split into teams of up to four people. Each team should get into a space where they can build without disrobing wildlife.
- Each team should get some scrap paper and pens or pencils. They should also get some poles, rope, and any fallen tree branches and wood they may have access to.
- Each team should try to think of 10 different camp gadget idea that use a tripod lashing. They should all be useful for daily camping activities.
- Each team should write a list of their gadgets that includes some rough diagrams of what they might look like.
- Meanwhile, the people leading the game should wander around and ask groups about their ideas. They should offer guidance and help people consider safety.
- Once a team’s reached 10 ideas, they should shout ‘Tripods 10 ways’! Everyone else should pause and go over to the team who have finished.
- Everyone should listen to the group talk through some of their favourite ideas.
- Each of the teams should take it in turns to present some of their ideas – it doesn’t matter if they didn’t get to 10.
Time to build
- Each team should choose at least one of their ideas to build.
- The teams should chat to make sure they’re not all making the same thing – the campsite doesn’t need six tables without any chairs, for example.
- Each group should chat to an adult about how they’ll risk assess their gadget, and how they’ll share any safety information with the rest of the group.
- Everyone should get stuck in to building their gadget.
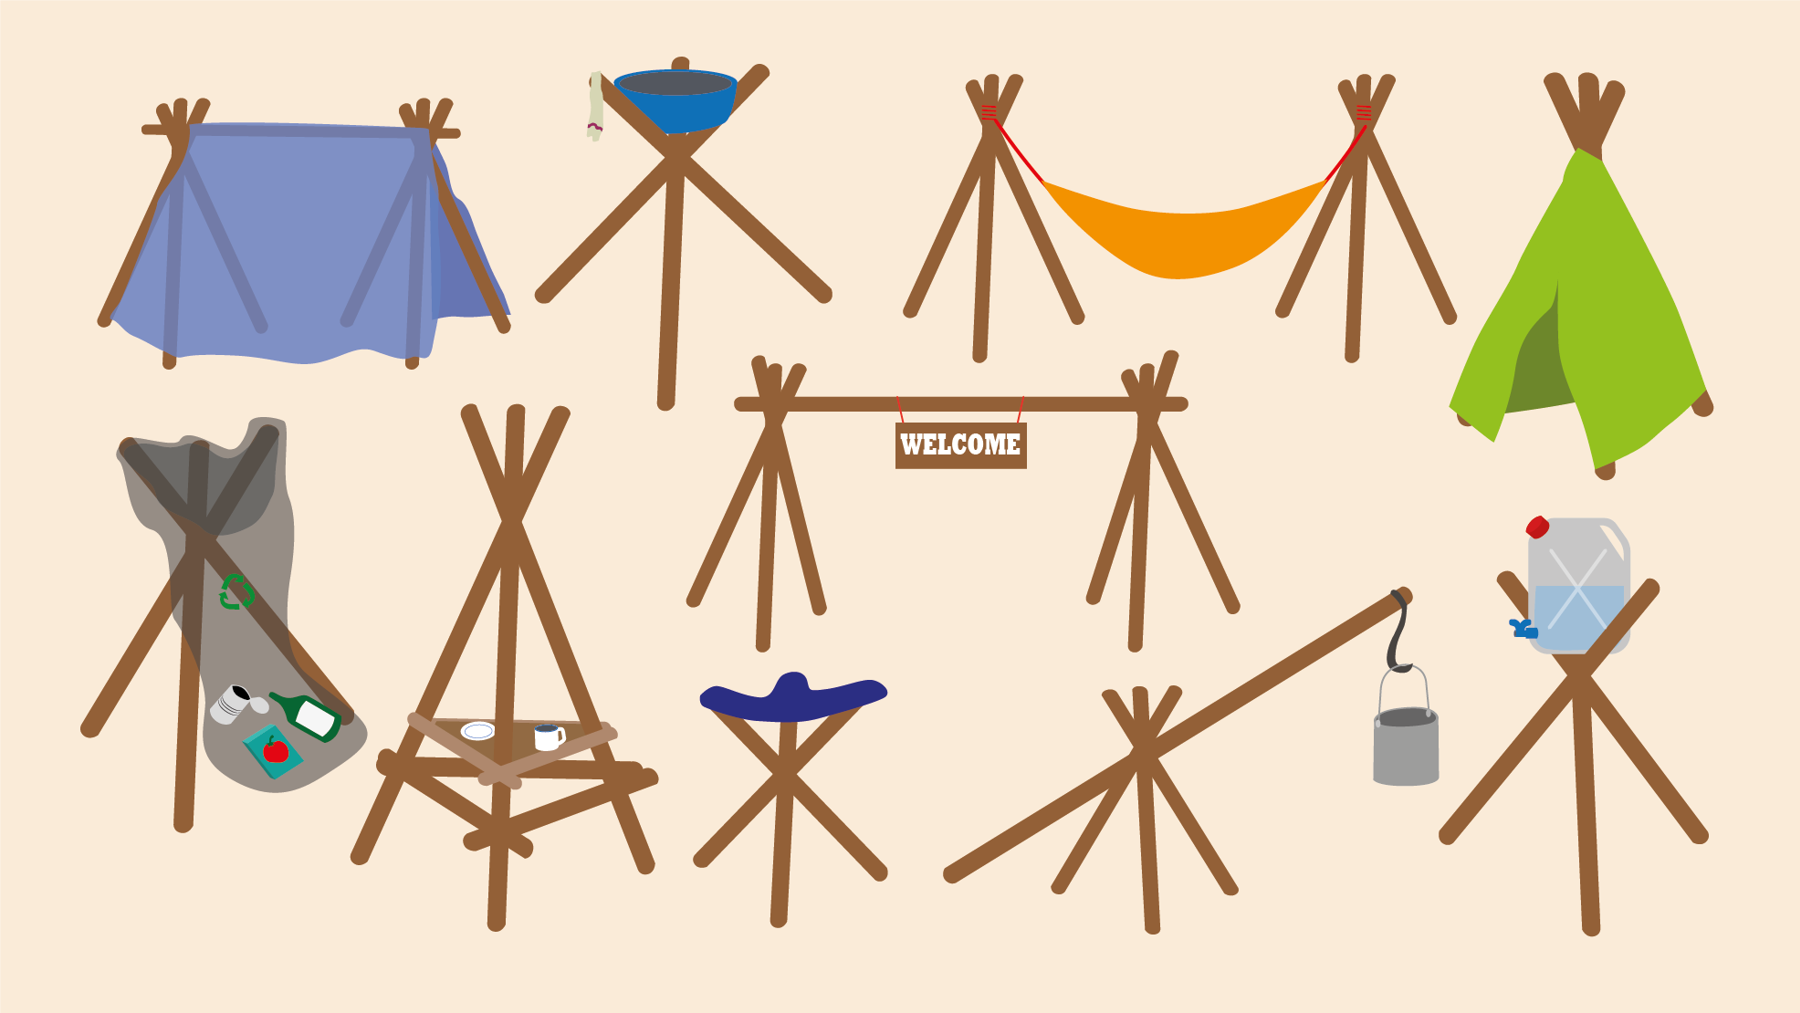
Below are some ideas so leaders and helpers can guide the group, you could also try taking a look at websites like Scout Pioneering and Pinterest:
- A simple wash basin
- A dishwashing station with multiple compartments
- A hanging water station
- Stools
- Triangular tables
- Benches
- Camp chairs
- Bin holders
- Tables
- Shelters of all different shapes and designs
- A triangular clothes rack
- Gadgets for camp cooking, for example, a tripod for crane support or two tripods and a pole to support suspended pots
- Supporting ends for a hammock
Reflection
This activity was all about developing skills. Are knots and lashings skills that can be useful for lots of different reasons? What other skills did people use in this activity? People might think about how they thought creatively, helped others develop their ideas, or adapted their ideas to the materials that were available. How did everyone make sure their ideas became a reality? It’s great to have big ideas, but being able to make them happen is important too.
This activity also needed people to stick at it, even when things weren’t easy. Did everyone’s creations work perfectly first time? How did it feel when things went wrong? What helped people pick themselves (and their projects) up and start again? Perhaps encouragement from others or focussing on the final goal helped people to try, try again.
Safety
All activities must be safely managed. You must complete a thorough risk assessment and take appropriate steps to reduce risk. Use the safety checklist to help you plan and risk assess your activity. Always get approval for the activity, and have suitable supervision and an InTouch process.
You must run your activities in line with the Safeguarding Code of Conduct for Adults (Yellow Card) and report any concerns to the UK HQ Safeguarding Team.
- You could make ‘Quick thinking’ into a competition. You could even award points for the most original ideas and the most useful ideas, as well as for the quickest team.
- People could try making a model of their project to perfect their design (and practise their tying skills) before they get stuck in to the real thing.
- You don’t have to use 10 ideas as the limit – adjust it to work for your group.
It’s OK if some people find it difficult to get involved in the physical building – they still have a really important role in generating ideas and making sure everyone follows the design. It can be useful to have someone overseeing the whole project, to point out where people need help or where the structure looks week.
All Scout activities should be inclusive and accessible.

Once you’ve mastered pioneering skills, there’s no limit to what you could make. What else might people like to try? What about something ambitious that uses more knots and lashings?
Young people should take the lead with this activity – it’s a chance for their creativity and problem-solving skills to shine as they improve their own camping experience.