Only a mile to go
You’ll need
- Pens or pencils
- A4 paper
- Tables
- Chairs
- String
- Paperclips
- 1:25000 OS map, multiple of the same area
- Compasses
- Roamer (optional)
Before you begin
- This activity requires groups to use bearings. Consider completing the Navigation stations activity first to boost everyone’s knowledge of navigation skills and compass techniques.
- Have everyone complete some research on navigation in the Hill and Moorland Leader Award to bring along with them to this session.
- Print out three sets of route plan cards for each group.
- Set out tables and chairs for each group, with at least one compass, map, writing materials, paper, route cards and roamers (if you’re using them) on each table.
- Decide upon a start and finish point for a 20km hike. These can be the same location or different locations, but should be big and obvious places like car-parks or building forecourts.
Background information
- Explain to everyone that they’ll be planning and writing down the route for a 20km hike with their group. Each route should be divided down into a minimum of six legs, though they’ll probably need more if they’re new to navigation. Split everyone into groups of between four and seven and have them sit at a table.
- Discuss the Hill and Moorland Award and have the groups share what they found out from their research among themselves. Encourage everyone to think about how the skills involved in the Award, as well as the guidance provided, might help plan a 20km hike.
- Move the discussion on to route cards. Each group should have three route cards on their table. Ask why they think route cards exist and how they’re used by hikers and navigators. Encourage them to think about safety considerations, how they could be used to help navigate and why this information should be written down first and then brought along on the hike.
- Have everyone examine their route cards. Go through each section of the card with them.
It’s planning time
- Have everyone open their maps and find the start and finish points decided earlier. Explain that their route needs to include these points, run for 20km in any direction and should be agreed upon by everybody before starting the route card.
- Fill in the route cards for the 20km hike. Have leaders or helpers go around to help, particularly with the first line. Make sure everyone understands what they’re doing and what information needs to be included.
- Everyone should need an hour to complete their routes. Each leg of the route will need clear instructions on the route card. To make sure everyone plays their part, groups could divide responsibility for each leg to different people.
- When the routes are ready and everyone’s satisfied with them, collect the route cards. Paperclip each group’s route cards together.
What next?
- Discuss what else the groups would have to do before setting off on their hikes. This should include:
-
- equipment
- safety information
- clothing
- group sizes
- age-range ratios
- what to do in an emergency
- the InTouch system
- risk assessments
- Run through some emergency scenarios with everybody and see how the group would respond. This should include:
-
- a first aid incident
- losing the map or route card
- getting lost
- getting caught in extreme weather
- Give each group A4 paper and writing materials. Everyone should draw a table with three columns. Write the titles ‘equipment’, ‘clothing’ and ‘safety stuff’ at the top of each column. Now, give each group 10 minutes to fill in each column with everything they think they’ll need for the hike.
- Go around the groups and have a person read out something from one of their columns. Keep doing this until each group has read out all of their ideas. Groups should add things they forgot to their own lists.
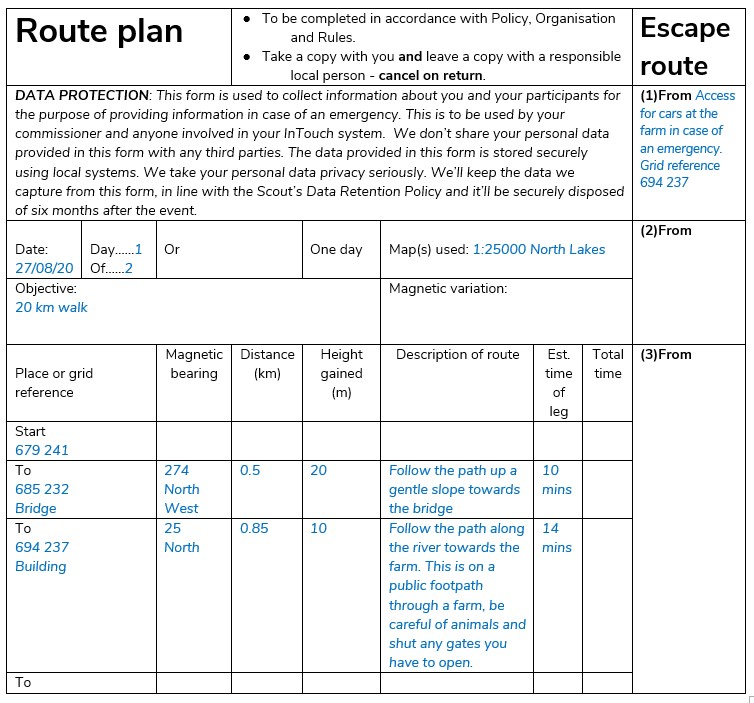
- Start: Their starting point for that leg. It needs both a name if possible and a six-figure grid reference. Just before setting off on the hike, get everyone to fill in a start time and their approximate ETA (estimated time of arrival) for each point.
- To: This is where you should have the grid reference of the destination and a brief description if needed. Legs can be written as one line for each or can be described in more detail. If there’s a point along the route that you think guidance or direction is needed, then add it into the route card. There’s no harm in having extra detail!
- Magnetic bearing: These are included to help everyone know where to go next and are especially helpful if visibility is poor.
- Distance: This is to show everyone how long this part is, and helps estimate the time of arrival. An easy way to measure distance is with a piece of string. Place the end of the string on the starting point on the map and hold it in place. Line up the rest of the string with your route up until the destination point on the map. Pinch the string at the point it meets the destination and lift it off the map. Pull the string tight but don’t let go of the pinch point. At the bottom of the map there’s a scale. Place the string on this scale and it’ll show you the distance.
- Height gained: Each contour between the start and end points needs to be counted. Find the closest contours to your route and use the numbers on them to work out whether you’re going up or downhill. When going uphill, add one minute to the ‘time allowed’ for each contour passed, and if going downhill don’t add any. If there’s both, add on and subtract the contours separately, before adding the final amount to the ‘time allowed’.
- Description of route: This is to help with navigation. It can be as simple as ‘follow the river’, or can include any landmarks that’ll be passed along the way. For example: ‘After walking under the bridge, turn left and follow the path until you reach the T-Junction. When you get there, turn right and carry on until you get to the farm.’
- Estimated time of leg: Work out the estimated time of the leg by adding on the total time to the start time of that section. This is helpful to the leaders as they can track the positions of groups and can monitor their progress throughout the hike.
- Total time: Consider factors such as going up and down hill and the impact that may have on your walking speed. Add any extra time to the estimated time of the leg and this will make your total time.
- Escape routes: This is for emergencies, so should include information about where it’s easy to collect everyone involved in an emergency.
Reflection
Going on a hike with your friends takes a lot of planning and preparation to make sure you know where you’re going and what to do in an emergency. Working as a team in this activity was very important. How did you work together to make sure everybody got involved in the planning process? What did you do to make sure all your teammates were on the same page and understood what was needed to navigate your planned route?
Learning key skills such as navigation and route planning can help you in the future. In what scenarios might it come in handy? Imagine you’re driving somewhere and take a wrong turn, or exploring in a different country that you’re unfamiliar with. Route planning helps you understand how to plan everything down to the smallest details, so that you can be confident that you know where you’re going.
Safety
All activities must be safely managed. You must complete a thorough risk assessment and take appropriate steps to reduce risk. Use the safety checklist to help you plan and risk assess your activity. Always get approval for the activity, and have suitable supervision and an InTouch process.
You must run your activities in line with the Safeguarding Code of Conduct for Adults (Yellow Card) and report any concerns to the UK HQ Safeguarding Team.
- Snow and ice
Be careful when activities involve snow and ice. Check surfaces and reduce the risk of slipping where possible. Have appropriate supervision for this activity.
- Outdoor activities
You must have permission to use the location. Always check the weather forecast, and inform parents and carers of any change in venue.
- Hiking and walking
Follow the guidance for activities in Terrain Zero, or the guidance from our adventurous activity pages.
- Dark
Provide some light, so the environment isn’t completely dark. Everyone must be able to see others and move around the area safely.
- Active games
The game area should be free of hazards. Explain the rules of the game clearly and have a clear way to communicate that the game must stop when needed. Take a look at our guidance on running active games safely.
- Road safety
Manage groups carefully when near or on roads. Consider adult supervision and additional equipment (such as lights and high visibility clothing) in your risk assessment.
Groups could plan hikes in which they have to use all of the navigational skills they’ve acquired on particular legs of the route. This may require some refreshers on skills like: orientating a map, taking bearings, finding grid references, making roamers, reading contours, triangulation and deviations. You’ll also need to make sure the routes pass through the relevant landscapes to use these skills.
Make sure the routes planned are accessible for everyone in the group. Specialist equipment (like medical devices) required by anyone to participate should be included on the list of essential equipment made in this activity.
All Scout activities should be inclusive and accessible.
Now that the route’s been planned, consider completing one or more of the routes with everyone. To do this, have a look here for more information and guidance on what to do before going on a hike with the group.
If anyone enjoyed this activity, point them towards the Hikes Away Staged Badge or Duke of Edinburgh’s Award, which can be completed in Scouts or at school.
This activity encourages everyone to work together and plan a hiking route of their own choice and to fill in all the information needed so they remain safe throughout. Consider giving everyone the opportunity to decide on their own start and finish points on the map.