
Making rainbows
You’ll need
- Scissors
- PVA glue
- Coloured pens or pencils
- Craft materials (for example, tissue paper, pipe cleaners, stickers)
- Scrap card
- Insulating tape
- A 5V colour changing LEF
- A USB (size A) power lead
- Wire cutters
- Wire strippers
Before you begin
- You need a size-A USB lead for this activity (USB-A). It’s probably the one that plugs into your laptop or computer. This is the most common kind and can be found in most tech stores or online, though many households have them lying around and it’d be great to repurpose some!
- USB-A cables carry 5V from a computer, and a colour-changing LED needs 5V of electricity to work, so the voltage of this circuit will be 5V.
Run the activity
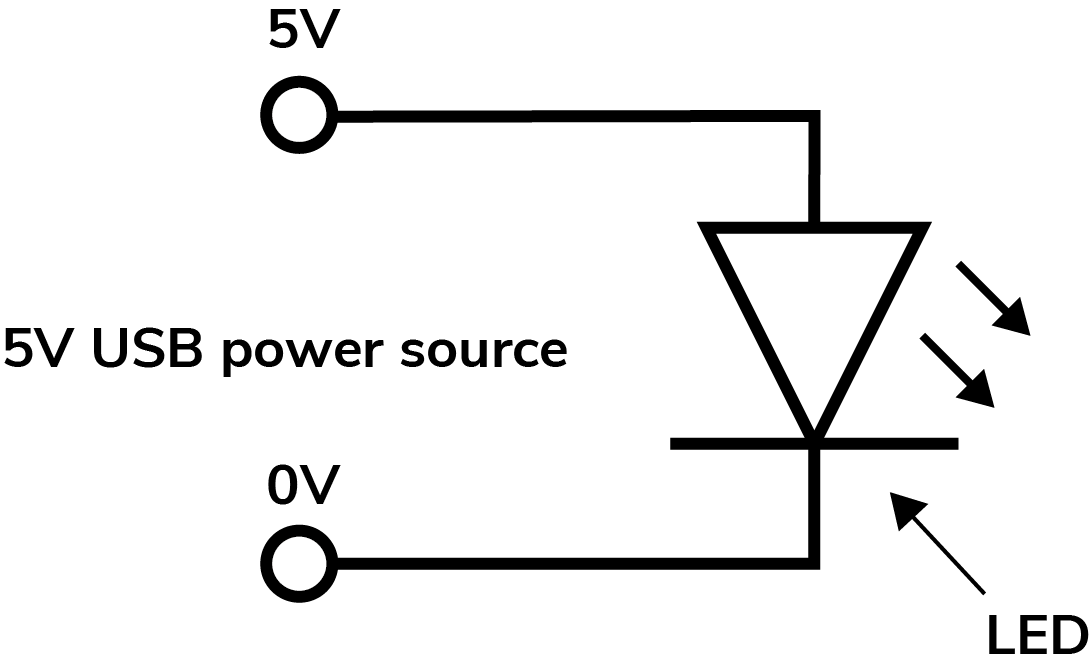
- Give out paper and pencils so that everyone can copy out the circuit diagram (above). Everyone should then collect their components and lay them out where they appear on the diagram, so that it’s clear what goes where.
- See that everyone understands how the circuit works.
- Cut the USB cable to size. Everyone should choose how much cable they’d like for their light. Bear in mind that it needs to be plugged in to work. Each person should end up with a cable the right length, with the USB plug at one end, and the other end cut.
- With wire-strippers, remove the outer casing from about 5cm from the cut end to expose the wires inside. There should be a red and black wire. Strip off 1-2cms of ‘insulation’ (plastic wire coating) from the ends of the red and black wires. Ignore any other wires.
- As electricity can only flow one way through an LED, they need to be wired the right way around. Identify the negative terminal on the LED. That’s the side with the flattened area on the case and the shorter leg. Identify the positive terminal on the LED. That’s the side with the rounded area on the case and the longer leg.
- Line up the negative terminal of the LED with the black wire, which is the negative terminal of the USB cable. Line up the positive terminal of the LED with the red wire, which is the positive terminal of the USB cable. Tape both negative and positive terminals together so that they stay touching.

- Plug the USB plug into a port on a computer or adaptor to see if it works. If the LED doesn’t light up, check that the terminals are lined up correctly and there are no breaks in the wire connections.
- If everything works as it should, disconnect your USB from the power source and think of a way to decorate your light. You could make a case from cardboard or other recycled materials, like ping-pong balls, or disguise it as another object. Try to make your light unique.
- Think about some uses for your light. It could help you read at night, feature on a computer mouse or enhance a desk ornament, like a plant-pot. Think of other things it could do.
Reflection
LEDs are common in modern tech. Many engineers prefer them to traditional light bulbs. Why do you think this is? Answer: LEDs are simpler and produce the same light output using less energy.
Have a look at your colour-changing LED. Why might it be nice to sit and look at it for a while? Watching changing colours is therapeutic and useful for anyone practising mindfulness. Always try to make some quiet moments for yourself, when you can flick on your mood light and relax.
Safety
All activities must be safely managed. You must complete a thorough risk assessment and take appropriate steps to reduce risk. Use the safety checklist to help you plan and risk assess your activity. Always get approval for the activity, and have suitable supervision and an InTouch process.
You must run your activities in line with the Safeguarding Code of Conduct for Adults (Yellow Card) and report any concerns to the UK HQ Safeguarding Team.
- Glue and solvents
Always supervise young people appropriately when they’re using glue and solvent products. Make sure there’s plenty of ventilation. Be aware of any medical conditions that could be affected by glue or solvent use and make adjustments as needed.
- Sharp objects
Teach young people how to use sharp objects safely. Supervise them appropriately throughout. Store all sharp objects securely, out of the reach of young people.
- Science
Supervise young people, and only do science activities that are advised and age appropriate for your section. Test activities first, to make sure you’re confident you can lead them safely. Use protective clothing where necessary.
- Manufacturer’s guidelines
All vehicles will be different so always follow the manufacturer’s guidelines.
- PPE
Before completing this activity make sure you have suitable personal protective equipment (PPE). This could include eye or ear protection, gloves, and anything else you need to protect yourself. You’ll know what you need as a result of completing the risk assessment for the activity.
- Soldering
Soldering irons produce a lot of heat. Never touch the tip of the soldering iron on anything other than the things you’re soldering and use tweezers or clamps to hold things in place. Never solder near flammable gases or liquids or combustible materials such as wood, textiles, or paper. Make sure there’s a fire extinguisher and a first aid kit (with items to treat burns) nearby.
Wear non-flammable clothing, gloves, safety goggles, and closed-toe shoes. Cover your arms and legs to prevent burns and remove loose clothing (such as scarves).
Work in a well-ventilated area to avoid inhaling fumes and keep food and drink away from the working area to avoid contamination.
- Electronics
Remove any equipment you’re working on from the power source before you begin. Never assume the power circuit’s off – test it with a voltmeter (and then test it again to be sure). Only connect power to a circuit once you’ve finished working on it and have checked your work. Make sure your circuit isn’t overloaded, and return any covers you’ve removed.
Make sure that all electronics equipment is properly grounded. Use the right electronics tools, and always replace damaged equipment (for example, replace cables rather than repairing them with insulating tape). Always have safety equipment including a fire extinguisher, basic first aid kit, and mobile phone nearby.
- Challenge keen rainbow-makers to add more than one colour-changing LED to the circuit. They should work out how much power they’ll need, what resistance they’ll have to add and how to redesign their light. Remember to use materials that help diffuse (give off) the light.
- For longer-lasting circuits, soldering could be used to join the wires. Remember to cover bare wires with insulating tape when the solder cools.
- Make sure everyone has everything they need to complete the tasks in this activity. Pair up or have helpers ready to lend a hand with fiddly bits.
- There are several ways this activity can be adapted. Wires can be taped or twisted together to complete the circuit, and soldering isn’t essential.
All Scout activities should be inclusive and accessible.

Think about some other useful circuits that could be powered in this way (by a USB cable). An expert might be able to tell you more.
This activity is a great opportunity for those with existing skills or an interest in electronics to share their knowledge. Encourage young people to pass on their skills to others by helping lead this activity or guiding anyone struggling.