
Discover how to make the perfect sand castle
You’ll need
- Child-safe play or construction sand
- A small castle-shaped bucket or equivalent mould
- Straws, spaghetti, matchsticks or twigs (depending on size of your bucket)
- Sheets of paper or coffee filters
- Plastic cups
- Small weights, such as tins
- Bucket of water
- A way to measure the water, such as a jug
Before you begin
- Use the safety checklist to help you plan and risk assess your activity. There's also more guidance to help you carry out your risk assessment, including examples. Don’t forget to make sure all young people and adults involved in the activity know how to take part safely.
- Make sure you’ll have enough adult helpers. You may need some parents and carers to help if you’re short on helpers.
- This is a great activity to run during an online session. Check out the advice on using Zoom and other popular digital platforms and the guidance on being safe online.
- Make sure you send the equipment list in advance of the meeting so everyone has time to get them in advance.
- The activity could be completed outside in gardens.
- If the activity is being done inside, make sure everyone protects their floor with towels or groundsheets or newspaper.
- Groupwork can be done individually at home, with everyone showing their sandcastles on camera after they have been completed.
- The weights for the activity can be unopened tins of food. Make sure everyone cleans any tins they have used after the activity.
Planning this activity
- For the play sand, we’d recommend having a look in local hardware store or garden centre. It’s the type of sand you’d use for a sandpit.
- The play sand will need to be divided equally between the groups, so you may want a bucket per group.
- If you’re running this activity inside, you might want to use something to keep all the sand together, such as a tarpaulin sheet, inflatable paddling pool or sandpit.
- Remember, some sand can cause staining. Try to choose sand that doesn’t stain clothing and ask everyone to wear suitable clothing that can get stained or dirty.
- Make sure the sand you’re using is reasonably dry. If it’s too wet, it won’t stick together, especially if more water is added. You can dry sand by leaving it spread out in a warm place.
Taking inspiration from the world around us
- Gather in a circle and ask everyone to name a famous building. People may think of Buckingham Palace, Big Ben or the Empire State Building.
- Ask everyone to think about why these building don’t fall down, crumble or lean to one side, except the Leaning Tower of Pisa, but sand castles just fall apart easily. Let a few people answer.
- Explain that the building conditions, strong foundations and the moisture content of the materials used are all factors that engineers need to consider when creating a sturdy and successful structure.
- Tell everyone that they’re going to do a few simple, but messy, experiments to understand how to create a solid foundation for building on.
Learning about compaction
- Tell everyone that they’re going to explore the impact of compaction has. You may want to run this activity outside.
- Ask if anyone knows what compaction means and why it might be important.
- Explain that compaction is what happens when something’s crushed or compressed. When things are compacted, they are often become tightly packed together and take up less space. It also makes the materials more solid and sturdier.
- Split everyone into small groups.
- Each group should make a mound out of sand, using just their hands.
- When they’re ready, they should put some weights on the top of their mound and see what happens.
- They should see that the mound quickly collapses. This is because where the sand that isn’t compacted doesn’t have much strength and there’s lots of space between the grains, so when the weight’s applied to the mound all the grains of sand can’t work together to support the weight.
- Explain that you’re going to try again. Each group should take a sandcastle bucket and slowly start adding sand, one cupful at a time.
- After adding each cup of sand, they should press down and compact the sand with their hands. Keep going until the bucket is full.
- When the bucket’s full, the groups should clear a space for the bucket to be turned upside down into. When ready, turn the bucket upside down and tap the top of bucket. Gently remove the bucket to make your sand castle.
- Now, add your weights again and see what happens. This time you should notice the sand castle can support more weight. The compacted sand is a lot stronger. This is because the sand is tightly packed together and there’s less space between the grains. The grains can work together to create friction and support the weight.
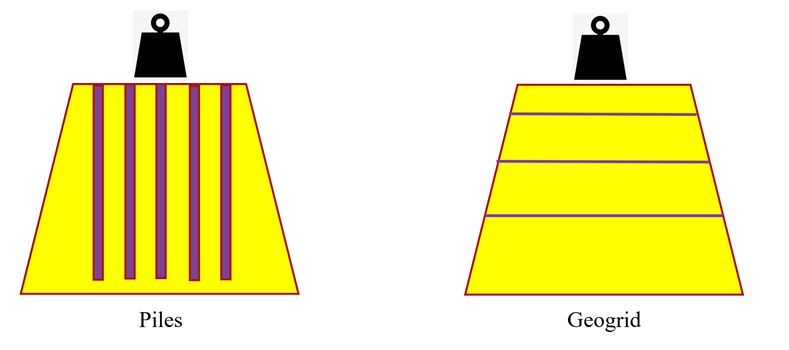
Discovering piles and geogrids
- Gather everyone back together as a group.
- Explain that if the strength of the ground materials isn’t enough to support the building, then engineers will turn to additional tools to help make the ground more stable and give the building stronger foundations.
- Tell everyone that the two tools they use to strengthen foundations are called piles and geogrid. See if anyone can guess what they may mean.
- Explain that piles are vertical columns that help to transfer load (or weight) from a building into the ground. They work by creating friction along their length and by going deep enough into the ground until they find solid material that can help to support the load.
- Explain that a geogrid is created when sheets of material (known as geotextiles) are laid vertically underground at regular intervals (or spaces) to help support the weight of the load. The geogrid works by distributing the load evenly and increasing the friction between the layers of ground that they separate.
- Tell everyone that they’re going to try experimenting to see how piles and a geogrid works.
Testing piles and geogrids
1. Getting back into their groups, each group is going to make three sandcastles. One sandcastle will be built with piles, one with geogrids and one without either. This will let groups explore different types of foundations.
2. Use the sand as 'soil' and using the materials to make your sandcastle strong as you can.
-
- For the piles, you could use straws, spaghetti, matchsticks or twigs (depending on size of your bucket). First, make a well-compacted sand castle. Once it’s made, carefully insert your piles at regular intervals in the sand.
- For the geogrids, you could use sheets of paper or coffee filters as ‘geotextiles’. Use a cup to put a bit of sand in your bucket, compact it and then add your paper or coffee filter. Repeat this until the bucket is full.
- For the regular sandcastle, after adding each cup of sand, they should press down and compact the sand with their hands. Keep going until the bucket is full.
3. When each bucket’s full, the groups should clear a space for each bucket to be turned upside down into. When ready, turn each bucket upside down and tap the top of bucket. Gently remove each bucket to make the sand castles. If each group has one bucket, they can make the sandcastles on at a time, or different groups can each type of sandcastle then come together to compare them.
4. Now, add the same initial weight to each sandcastle. You could keep adding weights until the sandcastle collapses to see which holds the most.
5. Discuss which sandcastle structure works best and if the sandcastles are stronger with or without the piles or geogrid.
6. Now it’s time to make improvements You could repeat the test and see if there’s an optimum spacing for the piles or geogrid to be.
7. When ready, bring all the groups back together to discuss what they found and why they think that may have happened. The improvements should have allowed you to add more weight, as the enhancements help to hold the sand together better.
Thinking about moisture
- Gather everyone back together as a large group.
- Now ask everyone why a sand castle at the beach falls apart as it dries or if it’s built with dry sand. Let a few people answer.
- Explain that dry sand is loose, so it’s harder to compact, and therefore there’s more space between the grains and the sand doesn’t stick together.
- Tell everyone that the water found in sand, and in many other materials we find in the ground, helps to secure and hold the material together. The water helps to create surface tension between grains that allow them to stick together and strengthen the sand, so it doesn’t fall.
- Explain that we can test the impact of moisture.
- Now, have each group build one last sandcastle, but this time ask each group to add a different amount of water, including one group using no water.
- Everyone should test the castles again, using the same amount of weight initially and adding more until the sandcastle falls or starts to buckle.
- Gather everyone to come back together and ask them how much water they used and what happened to their castle.
- Ask everyone to think about what the optimum amount of water was.
- Tell everyone that if it's too dry, the sand will slip and it's hard to pile up or compact, so it won’t be that strong. If it's too wet, the sand will be all slushy and again, the sand will be slippy and it’ll be hard to compact.
- You could let everyone try again and see who can get it just right for their sandcastle.
Tidying up
1. Now it’s time to tidy up. Make sure it’s shared between everyone, so they can work as a team – just like the grains of sand.
2. Everyone should wash their hands and brush off any sand from their clothes or shoes in a safe space to do so.
3. One group could collect and wash up the buckets.
4. One group could collect and wash the weights.
5. Decide what you want to do with the sand. Some ideas are:
-
- You could dry it out and reuse it, or add it to a sandbox.
- You could, owing to the properties of sand, add a layer to a compost pile. This’ll greatly improve the level of drainage and aeration. This is because sand has very coarse grains that allow air and moisture to pass through with ease.
- Sand has an abrasive nature and makes a good source of friction roads, pavements and driveways. It is a great alternative to rock salts and other anti-ice agents when things freeze up, so you could store it for winter.
- Add it to potted plants. Mixing sand with pea pebbles and placing it in your plant’s base will help with the pot’s drainage. A lot of plants – particularly indoor plants – will benefit from good drainage.
6. Once you’ve cleaned the sand, someone should sweep up the remaining sand. Remember to leave the meeting place as tidy and clean as you found it, if not cleaner!

This activity helps contribute towards some of the UN's Sustainable Development Goals. Find out more about the SDGs, and how Scouts across the world are getting involved.


Reflection
Every day, we rely on the ground beneath our feet to be strong enough to stop buildings, roads and yourself from sinking into it. Remember, everything we build is put on the ground. Therefore, engineers must think about the type of soil that they’ll build something on and how heavy something they are going to put onto it is. In this activity, we learned about the different ways engineers can make sure buildings are stable, solid and secure.
Can anyone remember the two types of foundation we tried? They were piles and geogrid.
Piles are usually found under tall buildings, or where the soil is weak. They spread the weight of a building or structure evenly across the depth of the soil. Engineers know the top of the soil won’t be able to hold much of the building’s load and the friction created on the edge of the piles helps spread the weight into the soil. This type of foundation has been used under the building called The Gherkin in London, which you may have seen.
Geogrid’s are normally used when loads need to be more horizontally spread out, such as in big hills, where lots of soil is built up, or under roads. The forces from the building on top of the soil cause the soil to spread sideways, just like squashing play-doh. The thin layers of a geogrid (called geotextiles), being built into the soil at regular depths, hold the soil together using friction and stop it from moving sideways.
You can apply what you have learned from this activity in lots of different ways.
Have you thought why your tent pegs sometimes don’t stay in the ground when it’s windy? Using what you’ve learned today, next time you can think if it’s the way you put them in or the ground you put them into.
This activity may have inspired you to be an engineer of the future, who uses this knowledge to build bigger buildings or create structures on less desirable material. It simply might help you to win the next sand castle building competition, too.
So, next time you’re out and about, look up at a building and then at your feet. Take a moment to think about the ground below you and the foundations used to keep the building up.
Safety
All activities must be safely managed. You must complete a thorough risk assessment and take appropriate steps to reduce risk. Use the safety checklist to help you plan and risk assess your activity. Always get approval for the activity, and have suitable supervision and an InTouch process.
You must run your activities in line with the Safeguarding Code of Conduct for Adults (Yellow Card) and report any concerns to the UK HQ Safeguarding Team.
- Scissors
Supervise young people appropriately when they’re using scissors. Store all sharp objects securely, out of the reach of young people.
- Craft: Unusual substances
Supervise young people appropriately when they’re using unusual substances, such as powdered paint, ash or dirt. Be aware of any medical conditions that could be affected by what’s being used. Make sure you follow all relevant safety guidance or manufacturers guidelines, where available. Make sure you dispose of it appropriately too, in line with safety guidance.
- Keep sand away from your eyes and mouth, make sure to wash your hands before touching your face
- Slips; sand can make the floor slippery, so make sure to clean it up especially if on a smooth surface - this is less of a problem if you're outside. You might want to put down some tarpaulin to shake off any sand outside at the end.
To make it easier, you might want to provide the suggestions on how to arrange the materials to stabilise the soil. 'Piles' should be arranged vertically within the soil, or sheets of 'geotextile' should be arranged horizontally.
- There are lots of different jobs that need doing when building the sandcastles. There’s a role for everyone, so encourage everyone to be involved in a way that works for them.
- If anyone needs help or struggles with fine motor skills, give them the opportunity to work in pairs with another young person, with a young leader or an adult volunteer. Alternatively, they could use larger materials. You could swap out the items for something easier to handle.
- If people may struggle with the compressing of the sand, is there another way they could join in? Could they pour the sand in the bucket or record what happens to share to the group? You could ask people to help them fill cups of sand for them to pour in, ask them to tap the sandcastle or they could lift the bucket off the sandcastle instead.
- If needed, let people be in bigger groups to make sure everyone’s supported in taking part in the activity. A young leader could join a group to help people to take part, too.
- Only ask people to move around the space in ways that work for everyone. Make sure the equipment is laid out with enough space for everyone, including anyone using a mobility aid, and make sure the objects are placed in areas that can be easily worked on and are accessible for everyone in the group, including wheelchair users.
- It’s OK if not everyone wants to share their ideas or talk in front of the group. If people aren’t comfortable sharing with the group, people could get into pairs or small groups to chat about what they’ve learned instead.
- If anyone doesn’t feel comfortable touching or putting their hands in the sand, they could put the weights on the sandcastles or wear gloves instead.
All Scout activities should be inclusive and accessible.

You might want to think of this on a bigger scale and how this is used in real life. As a group, think about what types of material under your feet would make a good building foundation and which would make a bad building foundation. You could compare wood, concrete, snow, sand and steel.