Contour creations
You’ll need
- Pens or pencils
- Tables
- Chairs
- PVA glue
- Cardboard, card and paper of different thicknesses
- Strong scissors
- OS map pictures
- Internet, computer and printer access, as needed
Before you begin
- Find as many cardboard boxes as you can. Ask in shops, restaurants and supermarkets to see if they have any clean ones that they’re finished with. If young people or helpers are able to bring some along in advance, let them know what you’ll be doing and see if they can help.
- Cut out the cardboard into A5-size squares. You’ll need at least one per person but make sure to save the rest for later.
- Print or copy out some hilly or mountainous cross-sections of OS maps from the internet. You can often find these using a Google Image search or on the Ordnance Survey website. You’ll need at least one for every two people. If you’re drawing these, here’s a guide for drawing contours from an aerial perspective.
- Print or make an example of a finished model.
- Set out tables and chairs for pairs or small groups to sit around. Put printouts or drawings of map cross-sections and finished models on the tables, alongside scissors, glue and writing materials. Set out one A5 cardboard square per person.
Construction time
- Split everyone into pairs or small groups. Each pair or small group should sit at a table and take a look at the printout or drawing of part of a map.
- Ask everyone how much they know about contour lines and what they mean. Explain what they look like, what they represent, what the numbers on them mean and what the distance between them shows.
- Have everyone look at their example model or picture. Explain the process behind creating it.
- Give everyone 45 minutes to build their own models based on the map extract in front of them. They should use one layer of cardboard for each contour of their hill or hills, and write on each level the height in metres. This information should be on their map extracts. These can then be glued together, using the map extract.
- When everyone’s finished, have pairs take turns to show their models and explain how they showed the key features picked out from the map extract.
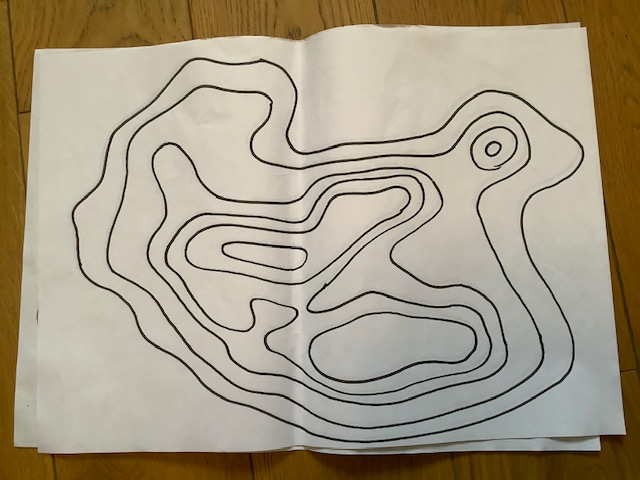
Simple contour models can be made using this technique and can be coloured in at a later date if needed:
Here you can see each contour drawn out (top image) and how it’s then represented in a model form (bottom image). Each layer is drawn on a piece of cardboard, cut out and then stacked on top of each other to show the formation of the ground. This contour picture can be copied from an OS map or the OS map printout itself can be used.
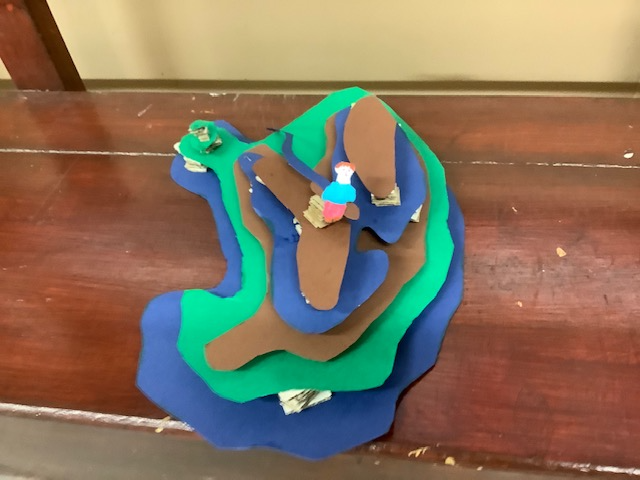
Thanks to 1st Cookham Scout Group for the images!
Reflection
Being able to read contour lines helps us while we’re out navigating as it tells us how high up we are and how steep the terrain is. Knowing when the terrain changes also helps us identify where we are and if we’re going the wrong way. When building your model you had to work out the correct sizes, shapes and key features needed on each contour level. How did you make sure all of your pieces correctly represented the hill you were creating? What did you find the most difficult when building the model? How do models like this help us learn to read contour lines?
Safety
All activities must be safely managed. You must complete a thorough risk assessment and take appropriate steps to reduce risk. Use the safety checklist to help you plan and risk assess your activity. Always get approval for the activity, and have suitable supervision and an InTouch process.
You must run your activities in line with the Safeguarding Code of Conduct for Adults (Yellow Card) and report any concerns to the UK HQ Safeguarding Team.
- Scissors
Supervise young people appropriately when they’re using scissors. Store all sharp objects securely, out of the reach of young people.
- Glue and solvents
Always supervise young people appropriately when they’re using glue and solvent products. Make sure there’s plenty of ventilation. Be aware of any medical conditions that could be affected by glue or solvent use and make adjustments as needed.
- Rubbish and recycling
All items should be clean and suitable for this activity.
Be aware that young people will be using scissors a lot, and in all likelihood cutting thick materials throughout. You may require more helpers to supervise these parts closely.
More intricate or larger extracts of maps will be harder to copy and will probably need more materials, though they’ll look pretty impressive when finished! Simple extracts will use less cardboard and should be completed quicker, leaving more time for presenting.
- Some people may require extra time to finish. Everyone could complete their models at home if you run out of time.
- Make sure everyone has everything they need to complete the tasks in this activity. Have some helpers lend a hand with the tricky bits, like cutting thick cardboard.
All Scout activities should be inclusive and accessible.
Have the group use their finished models to teach a younger group about map-reading and contour lines.