Navigation stations
You’ll need
- Tables
- Chairs
- Access to a computer
- Access to the internet
- 1:25000 OS maps
- Compasses
Before you begin
- This is a ‘bases’ activity, so make sure you have enough helpers coming along to run your bases in the session and some knowledgeable navigators among them to help explain the tricky bits.
- So that everyone’s familiar with the method, run the Six-figure bingo activity to teach everyone how to find a six-figure grid reference. You could run this before or after this activity.
- Set up enough tables and chairs for at least three groups. Put compasses and maps on each table.
Learn the basics
- Everyone should split into at least three groups and sit at a table. Explain that each group will be doing an activity at each table, with groups rotating between them throughout the session.
- Everyone should start by passing the compass on their table between one another and examining it. Point out the key features and explain what they do.
Here’s some more information to help.
- Start looking at bearings. Explain how to find them and why compasses point magnetic north. Everyone needs to understand this, so have a helper work with each group to talk through bearings before starting work on the bases.
- Once this is clear and everyone’s ready, run the bases. You could use the bases we’ve designed below.
Give everyone the opportunity to practice further any of the techniques from the bases if they feel they need to.
A bearing is a way to describe a direction. For example, instead of going ‘northwest’, you follow a bearing of ‘315’. They’re location-specific, so following the same bearing from different locations will take you in different directions.
To find a grid bearing:
- Find your location and your destination on a map.
- Place the compass on the map.
- Place the long edge of the compass between the two points to join them up.
- Make sure the direction of travel arrow at the top of the compass is pointing in the direction of travel (from the starting location to the destination).
- Rotate the bezel (large rotating circle on the compass) so that the lines inside it match up with the grid lines on the map. Make sure the north arrow inside it is pointing north on the map.
- Look at the top of the bezel (closest to the direction of travel arrow) and there will be a number on one of the rings. This is the bearing.
To convert your grid bearing to a magnetic bearing:
- After getting the bearing, lift the compass off the map
- You then add the Grid Magnetic Angle (GMA). In practice, this means adding on or subtracting a little to the grid bearing. How much you add or subtract varies, depending on where you are and what year it is, so don’t assume it’ll always be the same. All the information you need to calculate it should be supplied on the map key.
Have a look here for any additional information on bearings and watch this video for help getting a magnetic bearing.
- Walking on a bearing is simple. All you need to do is find the correct grid bearing, turn it into a magnetic bearing and follow it until you reach the destination. It’s important here to remind everyone to always look where they’re going and check the terrain when out walking. To help follow your bearing, think about using ‘tick features’ to help you along the way. These are things to check off as you walk past them on the route.
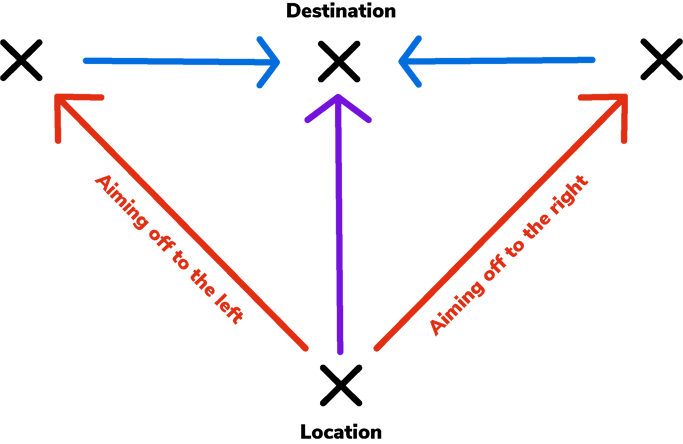
- Walking on bearings over long distances to a destination that may not always be visible reduces the accuracy of the bearing. To help combat this there’s a technique called ‘Aiming off’. This is where a bearing is set to the left or right of the destination deliberately to miss it. This means that at the end of the first bearing, it’s easy to tell which way to turn and walk to reach the original destination. You might even be able to see it. See the diagram below.
- When aiming off, look for a larger destination or point that’ll be easy to recognise. Things like walls or fences are great for this, as they’re easy to find and when reached they’re easy to follow.
- Back bearings are used to return to the original point, if someone believes they’ve got lost or gone off track. To get a back bearing, turn the original bearing round exactly 180 degrees. The easiest way to do this is by subtracting or adding 180. Follow this new bearing back to the original point, then either try again or redo the original bearing.
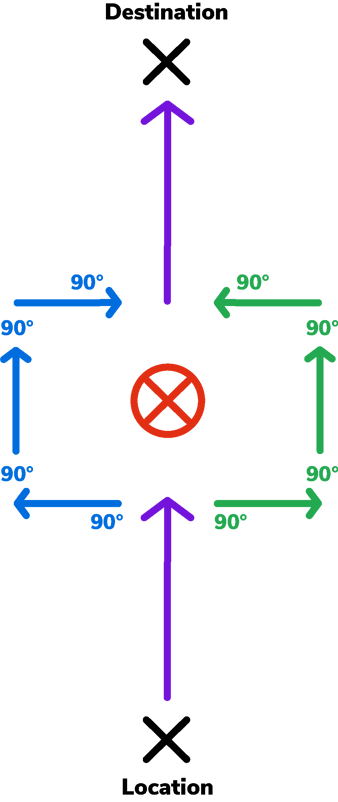
When out on a hike, coming across an obstacle in your path happens often. For small obstacles, such as puddles or small blockages, it can be easier to stay on your course and look for a quick way past. However, with large obstacles, such as fallen trees or blocked access to a field, you risk losing the course of your original bearing. To stop this happening, there’s a technique called ‘deviation’. This is the process of using four right-angled turns to stay on track. It doesn’t matter which way around the obstacle everyone goes, but it’s best to look on the map for a clear way. Having someone write down the different turns and bearings as you go is very helpful. Here’s how to do it:
- Write down the bearing you’re walking on and mark it on the map or note the grid reference.
- Turn the bezel 90° to the left or right, depending on the direction you’re going.
- Write down the new bearing number and turn to match the orientation arrow to the needle.
- Begin walking on the new bearing. Counting paces or measuring the distance on the map will help identify how far you’ve travelled.
- Once you’ve reached the way around, turn the bezel another 90° to the left or right and write down the new bearing.
- Redo steps four and five twice more. On the final time the bearing should be the same as the original bearing you started the walk with, before the deviation.
- If anyone’s unsure about where they’ve ended up or wants to be reassured they’re on the right course, start a new bearing from their current location to the destination.
It’s helpful to have done the A change of pace activity for information on pacing. If needed, add a pacing base to learn about pacing in this activity.
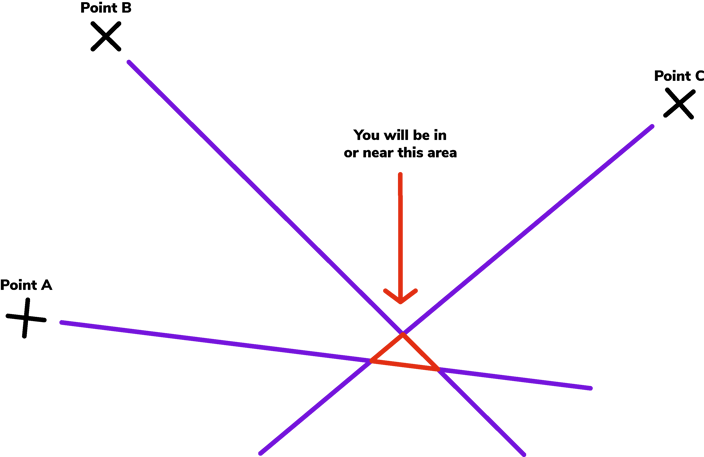
Triangulation is the process of finding a location using features and landmarks to estimate everyone’s current position. This is great if someone feels like they’ve got lost and can be used for training exercises.
- The first thing to do is find a landmark that can be seen both from your position and on the map.
- Take a bearing of this landmark. Do this by holding the compass flat on the palm of your hand and point the ‘direction of travel’ arrow directly at the landmark. Rotate the bezel until the needle is inside the orienting arrow. Look at the number on the rings: this is the bearing.
- Lay the compass on the map and align one of the corners of the long edge with the landmark.
- Keep one finger on the corner of the compass to hold it in place, then rotate the whole compass until the lines in the bezel match up with the grid lines on the map. Make sure the ‘N’ on the bezel is pointing to north on the map, but don’t rotate the bezel at this point.
- Draw a line on the map from the landmark down the long side of the compass. This is the first part of the triangulation.
- Repeat steps two to five twice more, using different landmarks.
- After drawing all the lines, there should be a small triangle where they join up. This is the approximate location of where you’re standing.
- If there’s a large triangle, start again or choose a different landmark if possible.
Reflection
Advanced navigation skills like finding bearings are used in hiking and expeditions to help people find their way around. Being able to understand techniques such as deviation and triangulation allows you to stay in control if something goes wrong when out in the wild. Were there any techniques in this activity that you already knew about, or were they new to you? How did you develop your existing skills in this activity?
If you didn’t know any of these skills, how did this activity help you to pick them up? Was it easier to work in groups on this? Imagine you’re out on a hike and get separated from your group. Why is it important that more than one of you knows these navigation methods?
Safety
All activities must be safely managed. You must complete a thorough risk assessment and take appropriate steps to reduce risk. Use the safety checklist to help you plan and risk assess your activity. Always get approval for the activity, and have suitable supervision and an InTouch process.
You could set some small challenges for the group to demonstrate their new skills, if anyone is really confident with bearings, deviations or triangulation.
Make sure everyone has everything they need to complete the tasks in this activity. Have helpers lend a hand with the fiddly bits. If anyone isn’t confident using the equipment, they could buddy up with someone more confident or take some more time to practice.
All Scout activities should be inclusive and accessible.

Have a go at the Compass drawings activity to put their new skills into practice. Also give people the opportunity to plan a full day’s hike and create route cards which will involve using bearings and other techniques when out walking.
Everyone had the opportunity to practice navigation methods individually and in their groups to improve their skills.